1 写在前面
微服务和容器化是工程领域过去5年多的革命性发展。从此,合格的程序员是Dev-Sec-Ops三合一的工种、敏捷不再是热门话题,因为逐渐成为日常、服务的可恢复性(resiliency)因为基础设施的使能,变得更容易实现……更重要的是,期间由此诞生了CNCF,云原生成为主旋律。
着眼当下,微服务数量激增、发布流程和中间件在云原生的进化中,我们需要在云操作系统(kubernetes)之上,有一层可以对发布、服务治理、中间件接入统一治理的基础设施。这是服务网格(Service Mesh)出现的意义——入坑姿势很重要,sidecar是表,服务治理是里。
kubernetes带给我们的是应用编排能力。k8s关注的是数据中心操作系统要解决的编排问题及相关的计算、存储、网络、安全问题;再往上看,不再是k8s要解决的核心问题。k8s提供了诸如CRD(以及阿里巴巴贡献给开源社区的OAM)、operator等方式,来保证其上的可扩展性和标准化,至于上层具体如何实现,不是k8s要关心的。
往上这一层是istio的地盘,istio带给我们的是更高级、抽象的服务治理能力。服务治理到底包含哪些内容,我没找到很权威的图。我从这些年做对话服务的角度,总结了一张图,如下图所示。
![870c5b83a0dfea2eb12dd9f830ba0e181745794f.png]()
我们在过去2-3年里,通过二方库(即阿里内部的lib,开源的lib叫三方库)的方式实现了这张图的大部分能力,但还是无法做完整。二方库实现相比业务代码实现,提供了足够的抽象和可复用性,但这两种方式的共同问题是代码侵入性和对底层中间件的强依赖。将这些能力从应用中剥离、交给istio去做才是未来的发展方向(,但这需要依赖于发布和中间件首先云原生化)。
2 WebAssembly闪亮登场
从服务治理的能力图中,我们很容易联想到istio是通过热插拔的方式来实现其可扩展性的。当envoy宣布支持wasm后,wasm作为istio未来可插拔的交付物,就是个时间表的事情。终于,istio1.5.0宣布(March 5, 2020)支持wasm,wasm从此走上云原生的舞台,即将开始她的表演。
2.1 istio的扩展性
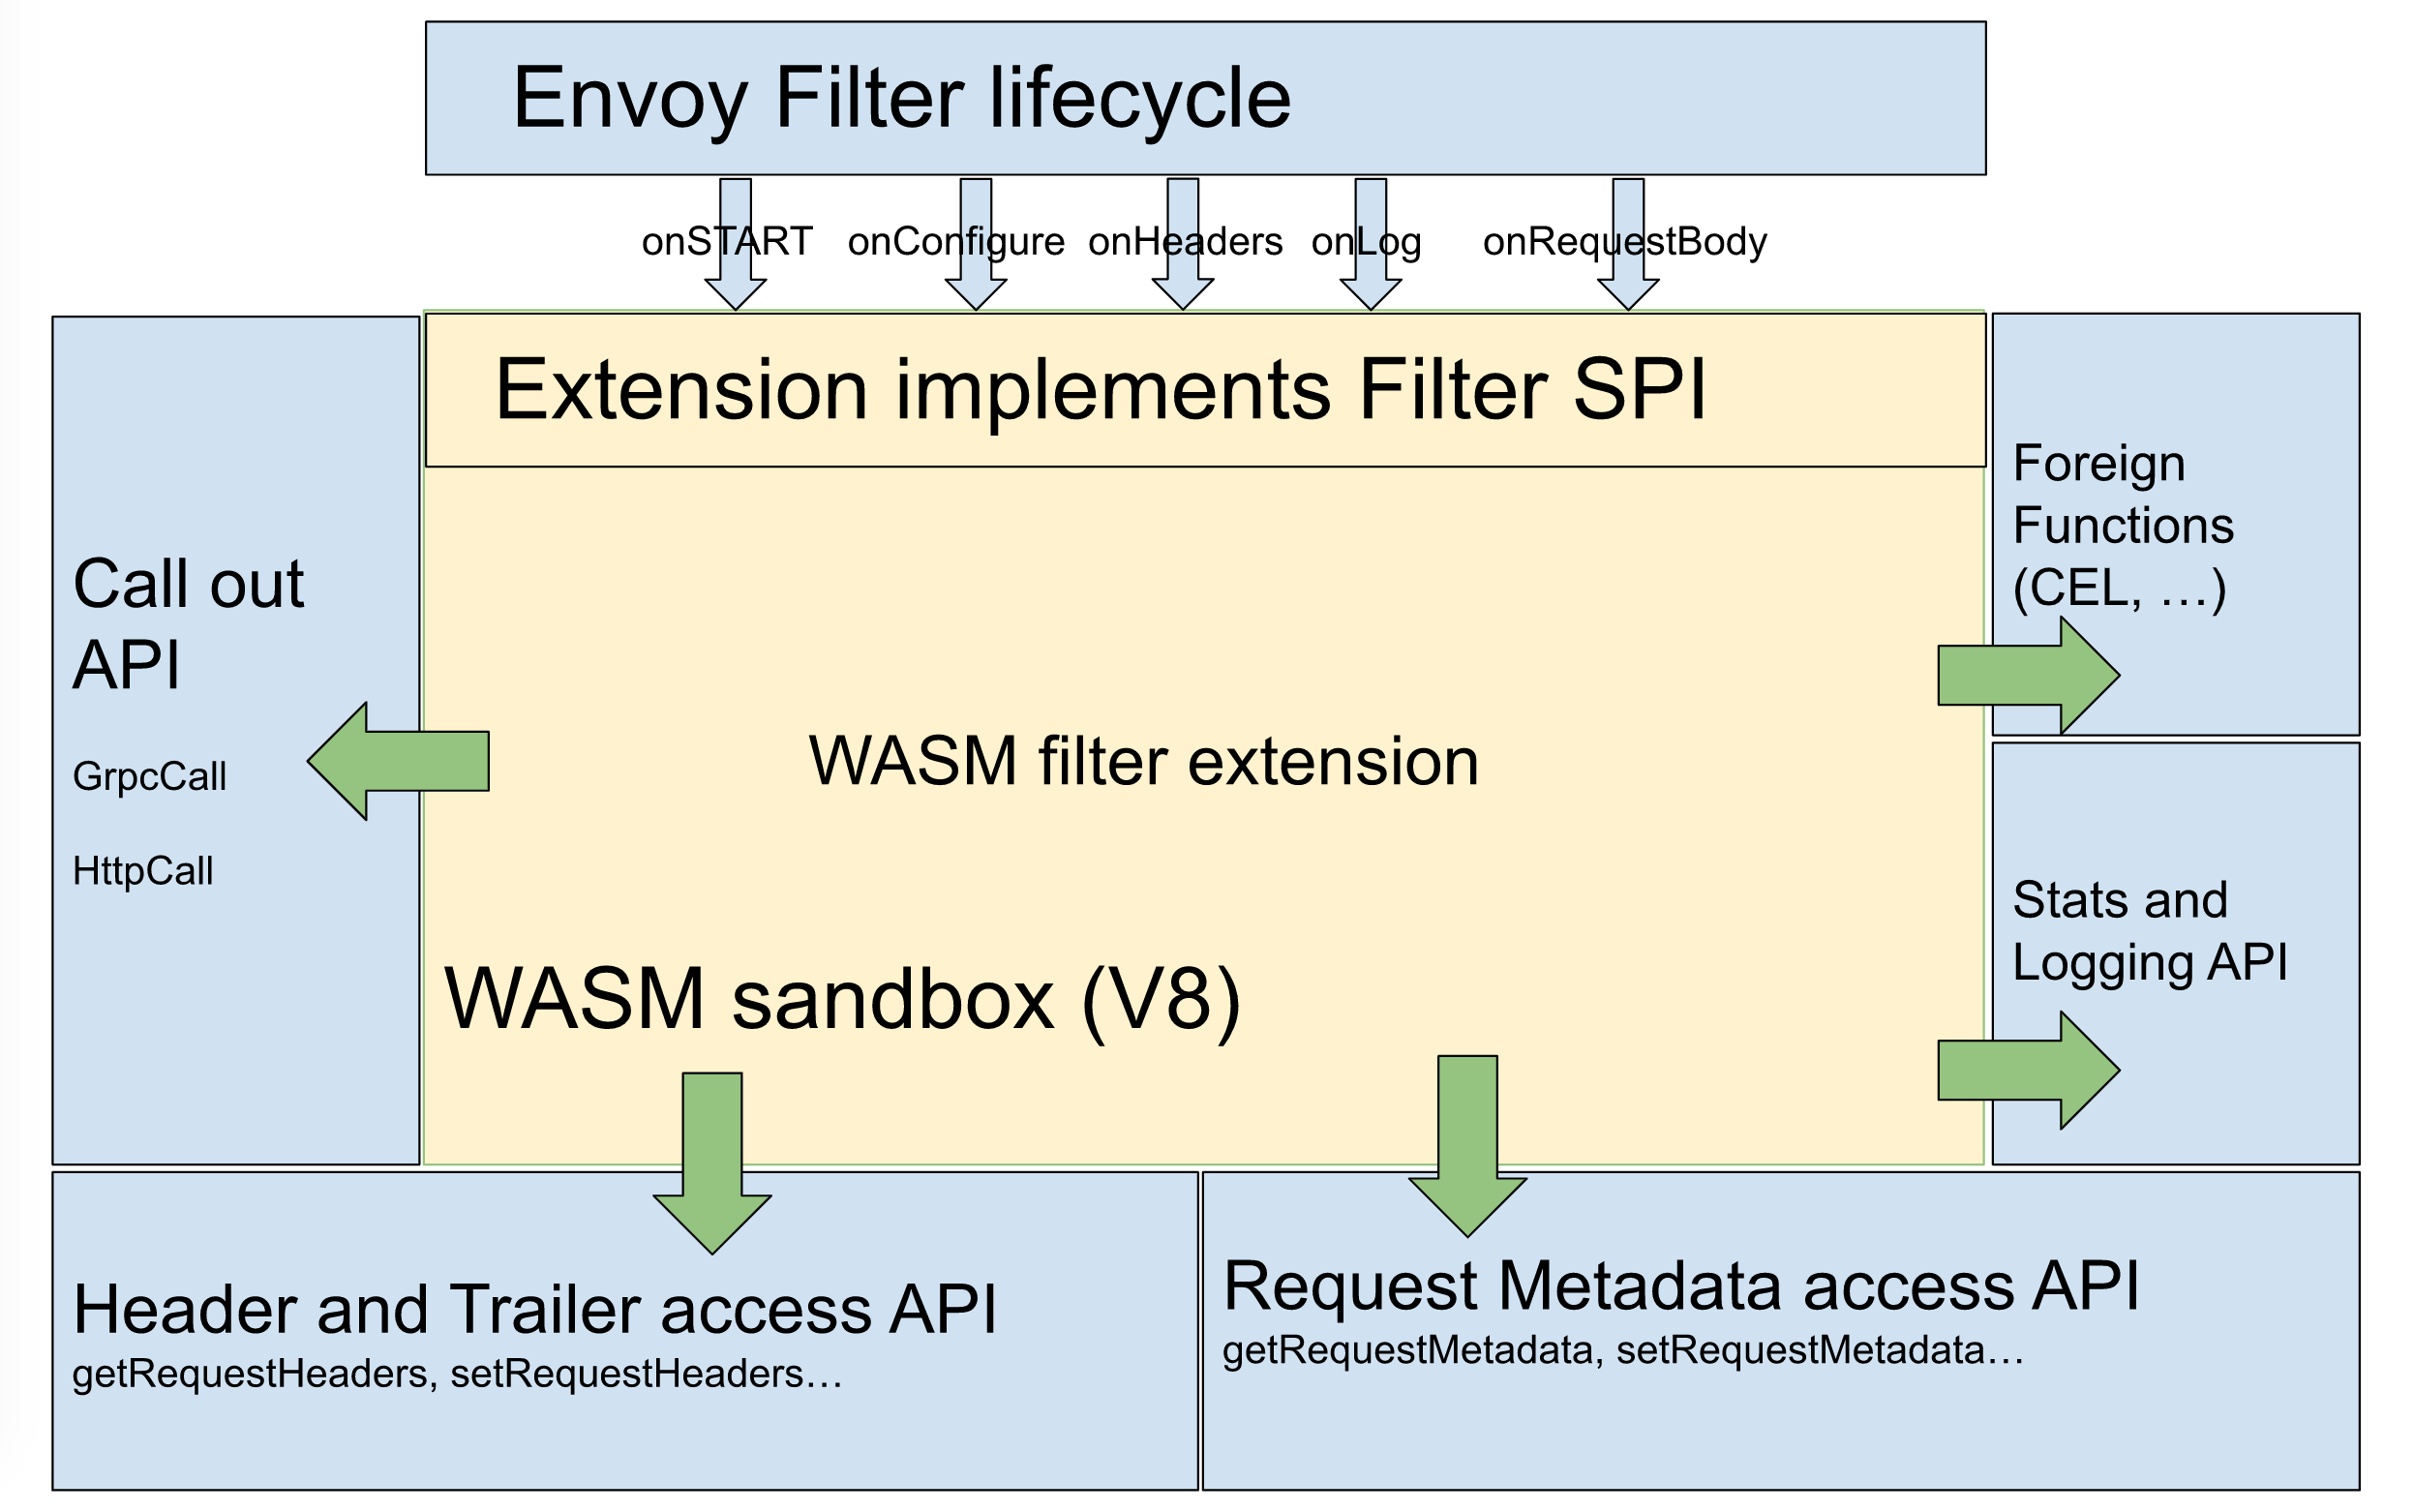
istio官网的最新文档中展示了wasm作为filter extension的架构图。未来,我们可以用任何自己擅长的编程语言,编写小巧的wasm代码,来实现各种扩展能力以结合自身业务增强服务治理。这还是非常让人兴奋的事情。
![istio-extending.png]()
那么,我们该怎样从开发代码到热部署一个wasm形式的插件到istio呢?接下来,我们一起看下wasm module的流水线。
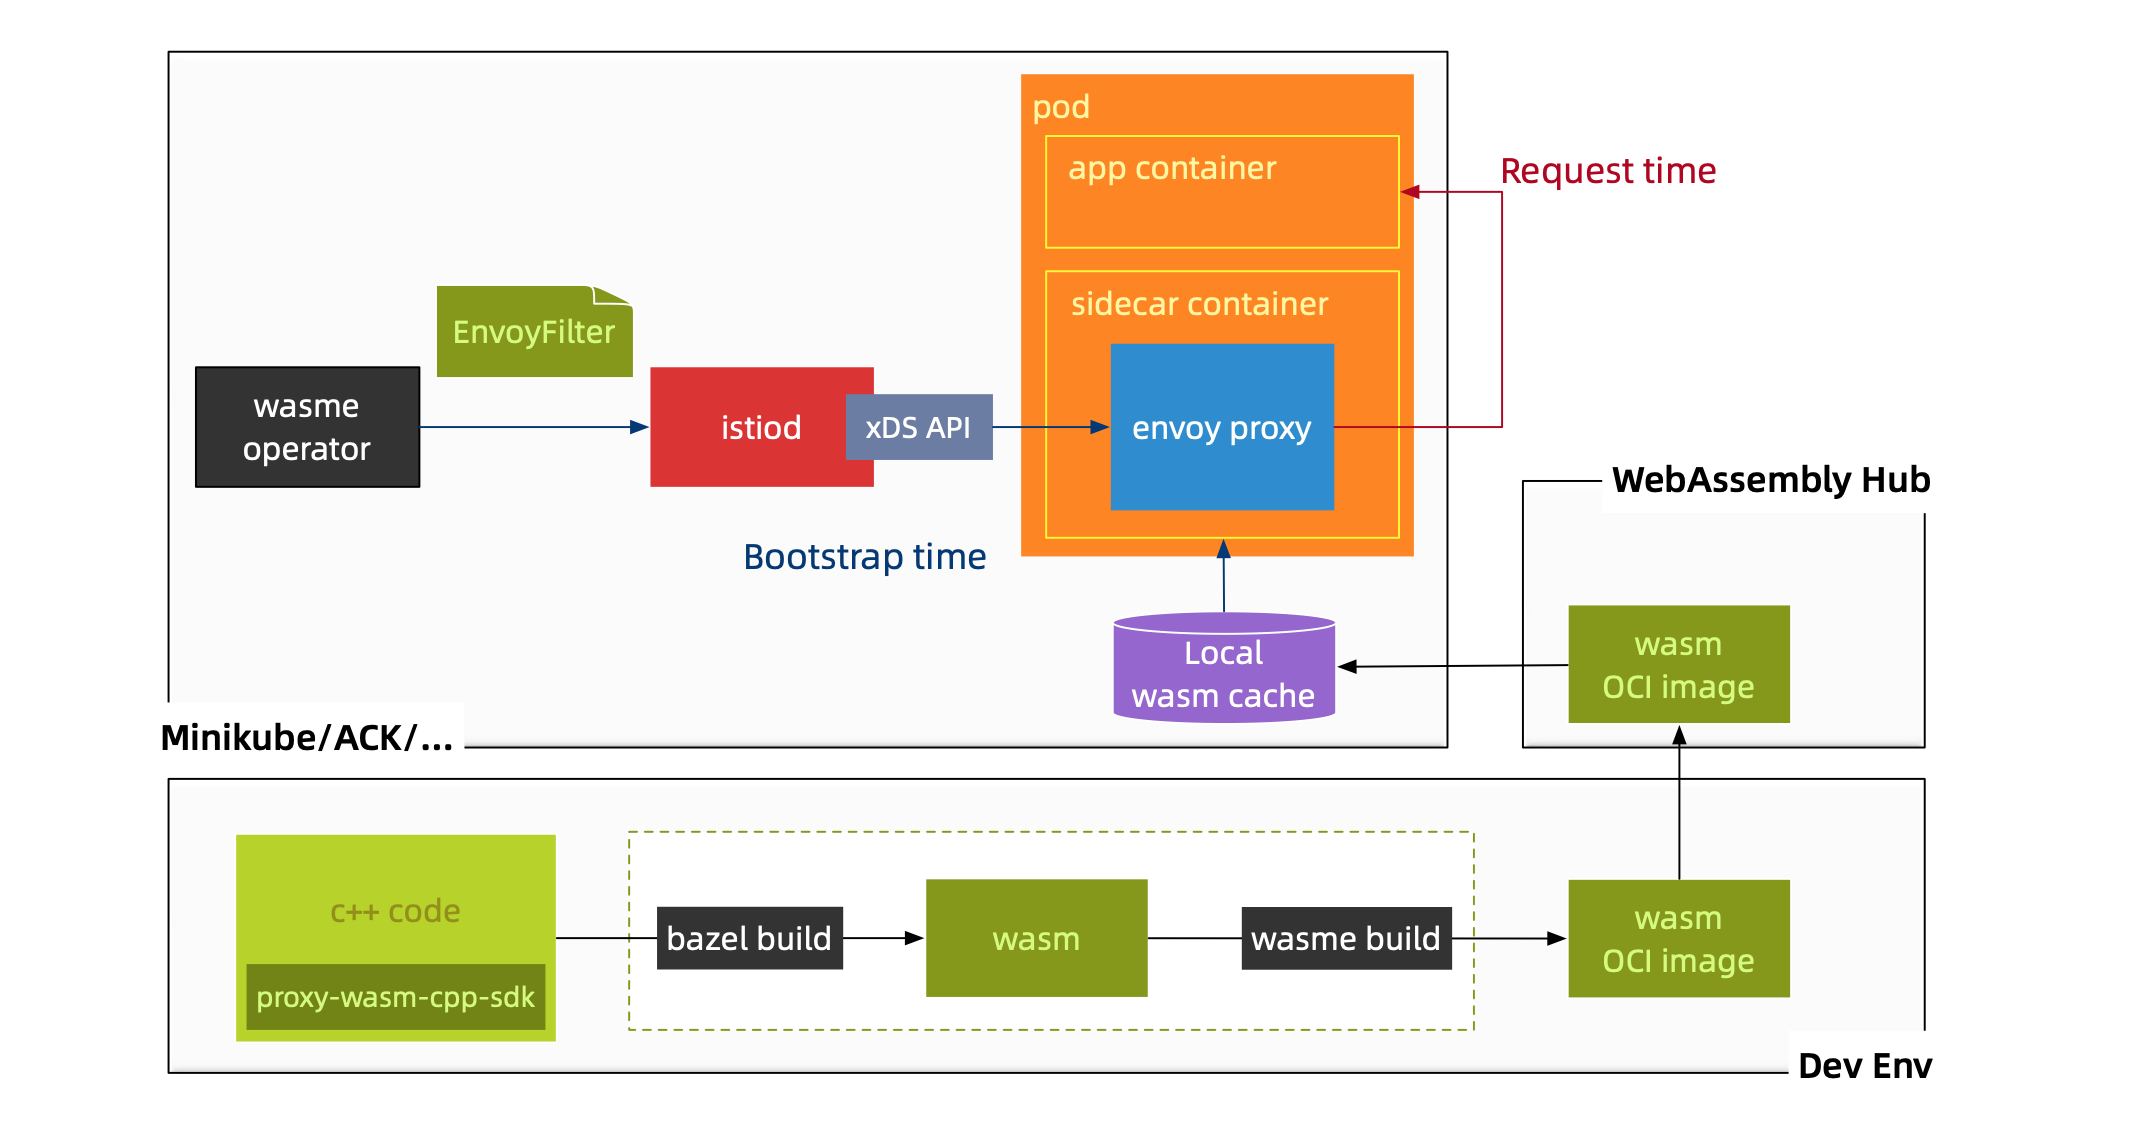
2.2 wasm module流水线
![wasm-pipeline.png]()
- 我们首先要基于proxy-wasm SDK开始自己的wasm module代码。因为现在处于很早期,目前wasme只支持初始化c++和AssemblyScript的wasm module工程。但很快就会支持Rust的!proxy-wasm ABI spec下,第一批sdk包含了C++、Rust、AssemblyScript。
- wasm module的工程使用Google bazel作为构建工具,代码开发完毕后,通过bazel构建出wasm包,然后通过wasme构建出wasm的oci image。当然,构建wasm包和oci image也可以使用wasme一步搞定,详见下文。
- 接下来使用wasme命令行登录WebAssembly Hub并推送镜像到WebAssembly Hub。
- 然后通过wasme命令行以
EnvoyFilter的形式,将wasm部署到istio-proxy容器中。
3 实战
Talk is cheap. Show me the code.
来吧,我们进入实战。
3.1 Installing wasme
首先是安装wasme这个cli,官方给出的是方法1,因为有墙,我建议使用方法2。安装完毕和执行wasme --version验证。
方法1(没有加速 有可能失败)
▶ curl -sL https://run.solo.io/wasme/install | sh
export PATH=$HOME/.wasme/bin:$PATH

Attempting to download Wasme CLI version v0.0.19
Downloading wasme-darwin-amd64...
方法2
# 直接下载 https://github.com/solo-io/wasme/releases/download/v0.0.19/wasme-darwin-amd64
# 然后执行如下命令
▶ chmod +x wasme-darwin-amd64
▶ mv wasme-darwin-amd64 /usr/local/bin/wasme
验证
▶ wasme --version
wasme version 0.0.19
3.2 Initialize a new filter project
我们使用wasme提供的初始化工程的命令,创建一个wasm module工程。如下命令会让你做出2个选择,第一个是语言,目前是c++和assembly script二选一;第二个是组件,gloo和istio二选一,即api gateway和service mesh,这里不做展开。本文展示的是c++/istio。
▶ wasme init cpp-filter
▶ cd cpp-filter
▶ tree
.
├── BUILD
├── README.md
├── WORKSPACE
├── bazel
│   └── external
│       ├── BUILD
│       ├── emscripten-toolchain.BUILD
│       └── envoy-wasm-api.BUILD
├── filter.cc
├── filter.proto
├── runtime-config.json
└── toolchain
    ├── BUILD
    ├── cc_toolchain_config.bzl
    ├── common.sh
    ├── emar.sh
    └── emcc.sh
▶ code .
使用你喜欢的IDE载入工程,这里以Visual Stiudio Code为例。修改filter.cc中的onResponseHeaders方法,示意如下。
FilterHeadersStatus AddHeaderContext::onResponseHeaders(uint32_t) {
  addResponseHeader(root_->header_name_, root_->header_value_);
  addResponseHeader("你好", "六翁");
  return FilterHeadersStatus::Continue;
}
代码功能很简单,在response header中,增加一行动态配置的config的kv信息,再增加一行硬编码信息:你好: 六翁。
3.3 Building WASM
接下来是构建。wasme提供了两种方式,第一种是先使用bazel构建出wasm,然后使用wasme构建oci image;第二种是一键傻瓜式搞定全部。我推荐方法1,因为GFW的存在,方法2会失败。
方法1 基于预编译构建
使用bazel构建wasm包。我对bazel的第一印象是太重了,因为我的第一次体验和其官方讲的fast相反(也许依然是墙的因素吧),为了这个示例我也是拼了。
▶ bazel build :filter.wasm

...
INFO: Elapsed time: 444.459s, Critical Path: 165.26s
INFO: 291 processes: 291 darwin-sandbox.
INFO: Build completed successfully, 294 total actions
这步结束后,我们有了wasm包,路径是bazel-bin/filter.wasm。接下来,我们使用wasme来包这个wasm包。最终得到的是名称为header-filter的镜像。
▶ WASM_HUB_USER=feuyeux
▶ wasme build precompiled bazel-bin/filter.wasm -t webassemblyhub.io/$WASM_HUB_USER/header-filter:v0.2
方法2 基于cpp构建
如下一行命令可以直接从c++工程进行构建出oci image。
▶ WASM_HUB_USER=feuyeux
▶ wasme build cpp -t webassemblyhub.io/$WASM_HUB_USER/header-filter:v0.2 .
wasme首先会下载一个名称为ee-builder的镜像,这个镜像用于bazel构建,尺寸2.12GB,有点猛。
Unable to find image 'quay.io/solo-io/ee-builder:0.0.19' locally
0.0.19: Pulling from solo-io/ee-builder
...
Status: Downloaded newer image for quay.io/solo-io/ee-builder:0.0.19
▶ docker images
REPOSITORY                           TAG                          IMAGE ID            CREATED             SIZE
quay.io/solo-io/ee-builder           0.0.19                       05c33d54ed1c        11 days ago         2.12GB
然后和方法1类似,使用bazel build :filter.wasm命令开始构建wasm。很不幸,我没有看到这步成功后是什么样。🤷♂️
Building with bazel...running bazel build :filter.wasm
Extracting Bazel installation...
Starting local Bazel server and connecting to it...
Loading:
...
Analyzing: target //:filter.wasm (15 packages loaded, 23 targets configured)
3.4 Pushing WASM
oci image包构建完毕后,我们将其发布到webassemblyhub.io,以便于envoy加载。请先注册账号。
▶ WASM_HUB_USER=feuyeux
▶ wasme login -u $WASM_HUB_USER

Enter password: *********
INFO[0006] Successfully logged in as feuyeux (Lu Han)
INFO[0006] stored credentials in /Users/han/.wasme/credentials.json

▶ wasme push webassemblyhub.io/$WASM_HUB_USER/header-filter:v0.2

▶ wasme list --search $WASM_HUB_USER
NAME                                    TAG  SIZE   SHA      UPDATED
webassemblyhub.io/feuyeux/header-filter v0.1 1.0 MB 16bb8169 31 Mar 20 07:00 UTC
webassemblyhub.io/feuyeux/header-filter v0.2 1.0 MB cf0602e9 31 Mar 20 10:54 UTC
推送完毕后,浏览器打开 https://webassemblyhub.io/repositories/73/header-filter 检验下是否成功发布。
3.5 Testing Bookinfo App
接下来,我们在istio的bookinfo示例上验证我们的wasm module。
示例环境准备
# 启动minikube环境
▶ minikube start --registry-mirror https://fwu2jk9e.mirror.aliyuncs.com --memory 4096

# 使用demo profile安装istio
▶ cd shop/istio-1.5.1
▶ istioctl manifest apply --set profile=demo
# 在default namespace启用sidecar自动注入
▶ kubectl label namespace default istio-injection=enabled --overwrite

# 发布bookinfo
▶ kubectl apply -f samples/bookinfo/platform/kube/bookinfo.yaml
# re run until all pods running and 2/2
▶ kubectl get po
NAME                              READY   STATUS    RESTARTS   AGE
details-v1-78d78fbddf-xjqwn       2/2     Running   0          58s
productpage-v1-85b9bf9cd7-sskwc   2/2     Running   0          57s
ratings-v1-6c9dbf6b45-7c2w4       2/2     Running   0          57s
reviews-v1-564b97f875-7nfg6       2/2     Running   0          57s
reviews-v2-568c7c9d8f-4n4ch       2/2     Running   0          57s
reviews-v3-67b4988599-zpc9j       2/2     Running   0          57s
测试 productpage —> details
为了比对,在热部署我们的wasm module之前,先看看productpage —> details这条链路上,从productpage 的sidecar请求 details时,收到的header信息:
▶ kubectl exec -ti deploy/productpage-v1 -c istio-proxy -- curl -v http://details:9080/details/123

...
< HTTP/1.1 200 OK
< content-type: application/json
< server: istio-envoy
< date: Tue, 31 Mar 2020 10:10:07 GMT
< content-length: 180
< x-envoy-upstream-service-time: 31
< x-envoy-peer-metadata: ..
< x-envoy-peer-metadata-id: sidecar~172.17.0.15~details-v1-78d78fbddf-xjqwn.default~default.svc.cluster.local
< x-envoy-decorator-operation: details.default.svc.cluster.local:9080/*
<
* Connection #0 to host details left intact
{"id":123,"author":"William Shakespeare","year":1595,"type":"paperback","pages":200,"publisher":"PublisherA","language":"English","ISBN-10":"1234567890","ISBN-13":"123-1234567890"}
3.6 Deploying the filter
现在可以发布我们的wasm module了。如下命令动态配置了一个config,用于验证代码行addResponseHeader(root_->header_name_, root_->header_value_)是否生效。
▶ wasme deploy istio webassemblyhub.io/feuyeux/header-filter:v0.2 \
    --id=header-filter \
    --config '{"name":"hello","value":"world"}'
再次测试 productpage —> details,我们可以看到预期的两行header信息。大功告成。
▶ kubectl exec -ti deploy/productpage-v1 -c istio-proxy -- curl -v http://details:9080/details/123

...
< hello: world
< 你好: 六翁
< x-envoy-peer-metadata: ...
...
{"id":123,"author":"William Shakespeare","year":1595,"type":"paperback","pages":200,"publisher":"PublisherA","language":"English","ISBN-10":"1234567890","ISBN-13":"123-1234567890"}
如果遇到如下问题 请稍后尝试 因为此时envoy proxy 未就绪
Unable to connect to the server: http2: server sent GOAWAY and closed the connection; LastStreamID=81, ErrCode=NO_ERROR, debug=""
3.7 cleanup
▶ wasme undeploy istio --id header-filter --namespace default

▶ kubectl delete -n default -f samples/bookinfo/platform/kube/bookinfo.yaml

▶ kubectl get po -A
到此,示例实操结束。期待rust版的release,期待wasm更广泛的使用场景。