Pod安全策略对于强化K8S集群安全至关重要。本文将延续之前的文章继续深入介绍Pod安全策略。
首先,简单介绍了如何将Pod与Pod安全策略相关联,并使用RBAC来展示具体步骤。然后介绍如何在Rancher中启用默认的PSP和创建自定义PSP。最后将使用一种工具来简化生产中Pod安全策略的使用,极大提升生产力,赶紧戳文咯~
![]()
本文来自RancherLabs
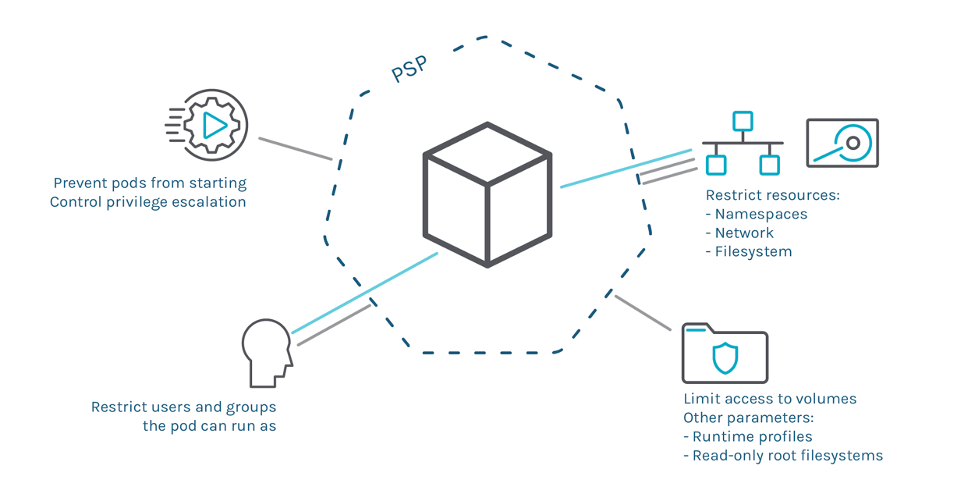
在之前的文章中,我们演示了如何使用受限的PSP策略作为默认值在Rancher中启用PSP。我们还展示了如何防止特权Pod被接纳到集群中。
![]()
我们有意省略了有关基于角色的访问控制(RBAC)以及如何将Pod与特定PSP连接的具体细节。那么,这篇文章让我们继续深入研究PSP。
将Pod与Pod 安全策略匹配
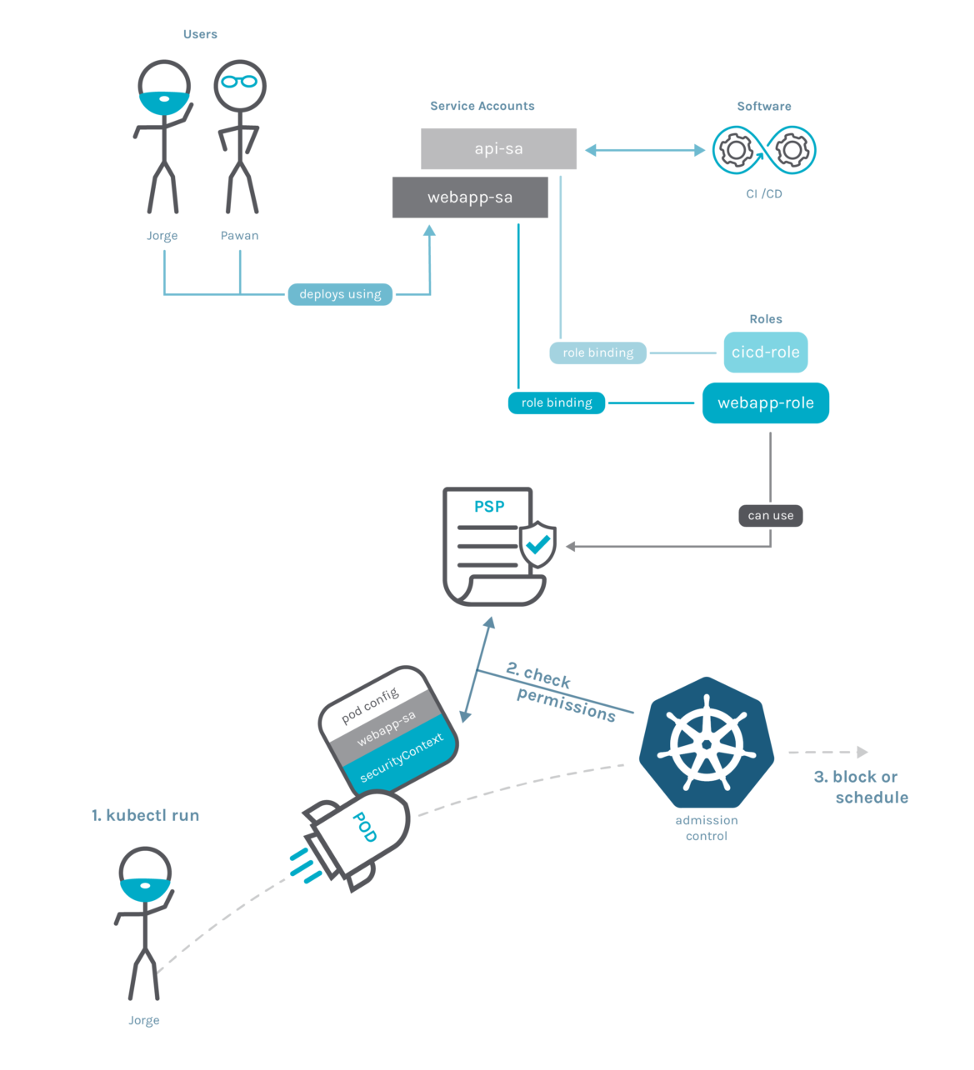
你可能已经注意到,PSP模式没有与任何Kubernetes命名空间、Service Account或Pod相关联。实际上,PSP是集群范围的资源。那么,我们如何指定哪些Pod应该由哪些PSP来管理呢?下图显示了所有参与组件、资源以及准入流程的工作方式。
![]()
也许一开始听起来很复杂。现在,我们来详细介绍一下。
部署Pod时,准入控制将根据请求deployment的对象来应用策略。
Pod本身没有任何关联的策略——执行该Deployment的是service account。在上图中,Jorge使用webapp-sa service account部署了pod。
RoleBinding将service account与Roles(或ClusterRoles)相关联,Role是指定可以使用PSP的资源。在该图中,webapp-sa与webapp-role关联,后者为特定的PSP资源提供使用许可。部署Pod时,将根据webapp-sa PSP对Pod进行检查。实际上,一个service account可以使用多个PSP,并且其中一个可以验证Pod就足够了。你可以在官方文档中查看详细信息:
https://kubernetes.io/docs/concepts/policy/pod-security-policy/#policy-order
然后,准入控制将决定Pod是否符合其中任何一个PSP。如果Pod符合要求,准入控制将调度Pod;如果Pod不符合规定,则会阻止部署。
以上内容可以总结为以下几点:
最后,需要有一个RoleBinding,它将Role(从而允许访问使用PSP)与Pod规范中声明的Servcie Account相关联。
让我们用一些例子来说明。
RBAC的真实示例
假设你已经有一个启用了PSP的集群,这是采用PSP创建限制性PSP的常用方法,该PSP可以被任意Pod使用。然后你将添加更为特定的PSP,该PSP有绑定到特定service account的其他特权。拥有默认、安全且严格的策略有助于集群的管理,因为大多数Pod不需要特殊的特权或功能,并且在默认情况下即可运行。然后,如果你的某些工作负载需要其他特权,我们可以创建一个自定义PSP并将该工作负载的特定service account绑定到限制较少的PSP。
但是,如何将Pod绑定到特定的PSP而不是默认的受限PSP?以及如何使用不自动添加RoleBindings的普通Kubernetes集群来做到这一点?
让我们看一个完整的示例,在该示例中,我们定义一些安全的默认值(集群中任何service account都可以使用的受限PSP),然后为需要该服务的特定deployment向单个service account提供其他特权。
首先,我们手动创建一个新的命名空间。它不会由Rancher管理,所以不会自动创建RoleBindings。然后我们在该命名空间中尝试部署一个受限的Pod:
$ kubectl create ns psp-test
$ cat deploy-not-privileged.yaml
apiVersion: apps/v1
kind: Deployment
metadata:
 labels:
   app: not-privileged-deploy
 name: not-privileged-deploy
spec:
 replicas: 1
 selector:
   matchLabels:
     app: not-privileged-deploy
 template:
   metadata:
     labels:
       app: not-privileged-deploy
   spec:
     containers:
     - image: alpine
       name: alpine
       stdin: true
       tty: true
       securityContext:
         runAsUser: 1000
         runAsGroup: 1000
$ kubectl -n psp-test apply -f deploy-not-privileged.yaml
$ kubectl -n psp-test describe rs
...
  Warning  FailedCreate  4s (x12 over 15s)  replicaset-controller  Error creating: pods "not-privileged-deploy-684696d5b5-" is forbidden: unable to validate against any pod security policy: []
由于命名空间psp-test中没有RoleBinding,且该命名空间绑定到允许使用任何PSP的角色,因此无法创建pod。我们将通过创建集群范围的ClusterRole和ClusterRoleBinding来解决此问题,以允许任何Service Account默认使用受限的PSP。之前的文章中启用PSP时,Rancher创建了受限PSP。
  resourceNames:
  - restricted-psp
---
apiVersion: rbac.authorization.k8s.io/v1
kind: ClusterRoleBinding
metadata:
  name: restricted-role-bind
roleRef:
  apiGroup: rbac.authorization.k8s.io
  kind: ClusterRole
  name: use-restricted-psp
subjects:
- apiGroup: rbac.authorization.k8s.io
  kind: Group
  name: system:serviceaccounts
$ kubectl apply -f clusterrole-use-restricted.yaml
我们应用这些更改之后,非特权deployment应正常工作。
但是,如果我们需要部署特权Pod,则不会被现有策略允许:
$ cat deploy-privileged.yaml
apiVersion: v1
kind: ServiceAccount
metadata:
  name: privileged-sa
  namespace: psp-test
---
apiVersion: apps/v1
kind: Deployment
metadata:
  labels:
    app: privileged-deploy
  name: privileged-deploy
  namespace: psp-test
spec:
  replicas: 1
  selector:
    matchLabels:
      app: privileged-deploy
  template:
    metadata:
      labels:
        app: privileged-deploy
    spec:
      containers:
      - image: alpine
        name: alpine
        stdin: true
        tty: true
        securityContext:
          privileged: true
      hostPID: true
      hostNetwork: true
      serviceAccountName: privileged-sa

$ kubectl -n psp-test apply -f deploy-privileged.yaml
$ kubectl -n psp-test describe rs privileged-deploy-7569b9969d
Name:           privileged-deploy-7569b9969d
Namespace:      default
Selector:       app=privileged-deploy,pod-template-hash=7569b9969d
Labels:         app=privileged-deploy
...
Events:
  Type     Reason        Age                From                   Message
  ----     ------        ----               ----                   -------
  Warning  FailedCreate  4s (x14 over 45s)  replicaset-controller  Error creating: pods "privileged-deploy-7569b9969d-" is forbidden: unable to validate against any pod security policy: [spec.securityContext.hostNetwork: Invalid value: true: Host network is not allowed to be used spec.securityContext.hostPID: Invalid value: true: Host PID is not allowed to be used spec.containers[0].securityContext.privileged: Invalid value: true: Privileged containers are not allowed]
在这种情况下,由于我们创建了ClusterRoleBinding,所以Pod可以使用PSP,但是restricted-psp不会验证Pod,因为它需要privileged 、hostNetwork等参数。
我们已经在前文中看到了restricted-psp策略。让我们检查一下default-psp的细节,这是由Rancher在启用PSP允许这些特权时创建的:
$ kubectl get psp default-psp -o yaml

apiVersion: policy/v1beta1
kind: PodSecurityPolicy
metadata:
  annotations:
    seccomp.security.alpha.kubernetes.io/allowedProfileNames: '*'
  creationTimestamp: "2020-03-10T08:45:08Z"
  name: default-psp
  resourceVersion: "144774"
  selfLink: /apis/policy/v1beta1/podsecuritypolicies/default-psp
  uid: 1f83b803-bbee-483c-8f66-bfa65feaef56
spec:
  allowPrivilegeEscalation: true
  allowedCapabilities:
  - '*'
  fsGroup:
    rule: RunAsAny
  hostIPC: true
  hostNetwork: true
  hostPID: true
  hostPorts:
  - max: 65535
    min: 0
  privileged: true
  runAsUser:
    rule: RunAsAny
  seLinux:
    rule: RunAsAny
  supplementalGroups:
    rule: RunAsAny
  volumes:
  - '*'
你可以看到这是一个非常宽松的策略,特别是我们允许privileged、hostNetwork、hostPID、hostIPC、hostPorts以及以root身份运行以及其他功能。
我们只需要明确允许该Pod使用PSP。我们通过创建类似于现有restricted-clusterrole的ClusterRole,但允许使用default-psp资源,然后为我们的psp-test 命名空间创建RoleBinding来将privileged-sa ServiceAccount绑定到该ClusterRole:
$ cat clusterrole-use-privileged.yaml
---
apiVersion: rbac.authorization.k8s.io/v1
kind: ClusterRole
metadata:
  name: use-privileged-psp
rules:
- apiGroups: ['policy']
  resources: ['podsecuritypolicies']
  verbs:     ['use']
  resourceNames:
  - default-psp
---
  apiVersion: rbac.authorization.k8s.io/v1
  kind: RoleBinding
  metadata:
    name: privileged-role-bind
    namespace: psp-test
  roleRef:
    apiGroup: rbac.authorization.k8s.io
    kind: ClusterRole
    name: use-privileged-psp
  subjects:
  - kind: ServiceAccount
    name: privileged-sa
$ kubectl -n psp-test apply -f clusterrole-use-privileged.yaml
一会儿之后,特权Pod将会被创建。然后你会注意到restricted-psp和default-psp现在已经可以直接使用。接下来,我们来详细介绍一下它们。
在Rancher上默认的PSP
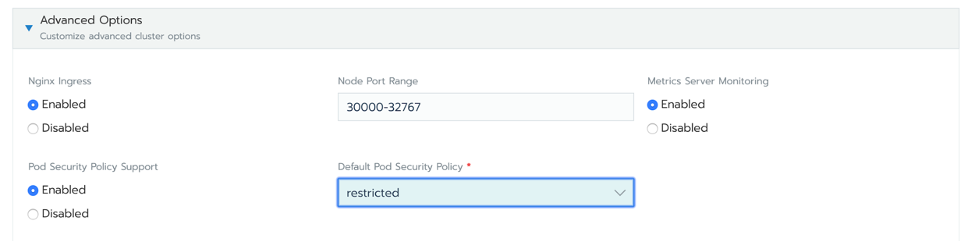
在Rancher中通过编辑集群设置来启用PSP准入控制,并选择其中一个已经定义好的PSP作为默认选项:
![]()
Rancher将在集群中创建一对PSP资源:
除了restricted-psp和default-psp,Rancher还会创建名为 restricted-clusterrole的ClusterRole:
 annotations:
    serviceaccount.cluster.cattle.io/pod-security: restricted
  creationTimestamp: "2020-03-10T08:44:39Z"
  labels:
    cattle.io/creator: norman
  name: restricted-clusterrole
rules:
- apiGroups:
  - extensions
  resourceNames:
  - restricted-psp
  resources:
  - podsecuritypolicies
  verbs:
  - use
此ClusterRole允许使用restricted-psp策略。那么Binding在何处才可以允许授权使用pod ServiceAccount 呢?
对于属于Rancher中项目的命名空间,它还在其中为你设置RoleBinding配置:
$ kubectl -n default get rolebinding default-default-default-restricted-clusterrole-binding -o yaml
apiVersion: rbac.authorization.k8s.io/v1
kind: RoleBinding
metadata:
  annotations:
    podsecuritypolicy.rbac.user.cattle.io/psptpb-role-binding: "true"
    serviceaccount.cluster.cattle.io/pod-security: restricted
  labels:
    cattle.io/creator: norman
  name: default-default-default-restricted-clusterrole-binding
  namespace: default
...
roleRef:
  apiGroup: rbac.authorization.k8s.io
  kind: ClusterRole
  name: restricted-clusterrole
subjects:
- kind: ServiceAccount
  name: default
  namespace: default
资源名称(default-default-default-restricted-clusterrole-binding)可能会令人感到困惑,实际上它的构成为:
default-serviceaccountname-namespace-restricted-clusterrole-binding
并且如果你创建一个类似myserviceaccount的新的service account,那么将会自动创建一个新的角色绑定:
$ kubectl create sa myserviceaccount
serviceaccount/myserviceaccount created
$ kubectl get rolebinding
NAME                                                              AGE
---
default-default-default-restricted-clusterrole-binding            13m
default-myserviceaccount-default-restricted-clusterrole-binding   4s
借助这种神奇的功能,你无需为不需要任何提升特权的安全pod配置RBAC。
在Rancher中创建你的PSP
PSP是一个标准的Kubernetes资源,全程是Pod安全策略,所以你可以通过Kubernetes API或kubectl CLI来使用它。
你可以通过在YAML文件中定义它们来创建你的自定义PSP,然后使用kubectl在集群中创建资源。查看官方文档即可了解所有可用控件(https://kubernetes.io/docs/concepts/policy/pod-security-policy/ )。在YAML中定义了控件集之后,你可以运行:
$ kubectl create psp my-custom-psp
以创建PSP资源。
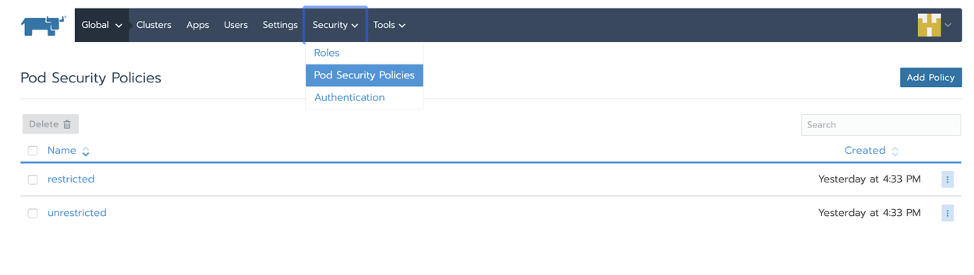
使用Rancher,你可以从UI中直接查看或添加新的策略:
![]()
PSP十分强大,但也十分复杂
配置Pod安全策略是一个十分乏味的过程。你在Kubernetes集群中启用PSP之后,你想要部署的任意Pod都必须经由其中一个PSP允许。实施强大的安全策略可能十分耗时,而且为每个应用程序的每个deployment生成一个策略也是一种负担。如果你的策略十分宽松,那么不强制执行最小特权访问方法;然而,如果它存在很多限制,你可能会破坏你的应用程序,因为Pod无法在Kubernetes中成功运行。
能够以最少的访问要求集自动生成Pod安全策略,将帮助你更轻松地安装PSP。并且你不能只在生产环境中部署它们,而不验证你的应用程序是否可以正常工作,而且进行手动测试既繁琐又效率低下。如果你可以针对Kubernetes工作负载的运行时行为验证PSP呢?
如何简化生产环境中PSP的使用?
Kubernetes Pod安全策略 Advisor(又名kube-psp-advisor)是一个Sysdig的开源工具。kube-psp-advisor会从Kubernetes资源(如deployment、daemonset、replicaset等)中扫描现有的安全上下文,将其作为我们想要执行的reference模型,然后在整个集群中为所有资源自动生成Pod安全策略。kube-psp-advisor通过查看不同的属性以创建推荐的Pod安全策略:
-
allowPrivilegeEscalation
-
allowedCapabilities
-
allowedHostPaths
-
hostIPC
-
hostNetwork
-
hostPID
-
Privileged
-
readOnlyRootFilesystem
-
runAsUser
-
Volume
查看kube-psp-advisor教程,以获取有关其工作原理的更多详细信息:
https://sysdig.com/blog/enable-kubernetes-pod-security-policy/
使用Sysdig Secure自动生成PSP
Sysdig Secure Kubernetes Policy Advisor可以帮助用户创建和验证Pod安全策略。
第一步是设置新的PSP模拟环境。你可以针对不同范围内的不同策略(例如Kubernetes命名空间)进行多种模拟。
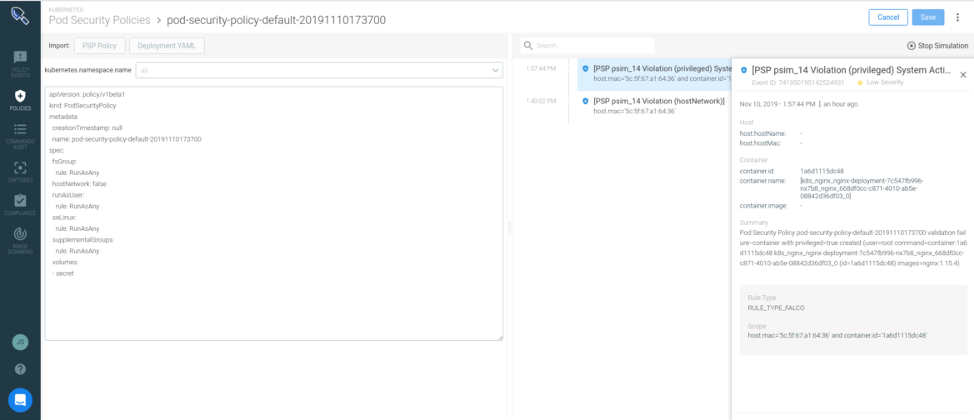
Sysdig在你的Deployment定义中分析Pod规范的要求,并为你的应用程序创建权限最小的PSP。这可以控制是否允许特权Pod,用户将其作为容器、volume等运行。Ni 可以微调PSP并针对你将要运行的模拟环境定义命名空间:
![]()
左侧的策略会破坏应用程序,因为nginx Deployment是特权Pod,并且具有主机网络访问权限。你必须决定是扩大PSP以允许这种行为,还是选择减少Deployment的特权以适应该策略。无论如何,你在应用PSP之前都会检测到此情况,这会阻止Pod运行并在应用程序部署上造成破坏。
结 论
如这些示例所示,通过授予或拒绝对特定资源的访问,PSP使你可以对在Kubernetes中运行的Pod和容器进行精细控制。这些策略相对来说容易创建和部署,并且应该是任何Kubernetes安全策略的有用组件。