![nio]()
你好,我是彤哥,本篇是netty系列的第三篇。
欢迎来我的公从号彤哥读源码系统地学习源码&架构的知识。
简介
上一章我们介绍了IO的五种模型,实际上Java只支持其中的三种,即BIO/NIO/AIO。
本文将介绍Java中这三种IO的进化史,并从使用的角度剖析它们背后的故事。
Java BIO
BIO概念解析
BIO,Blocking IO,阻塞IO,它是Java的上古产品,自出生就有的东西(JDK 1.0)。
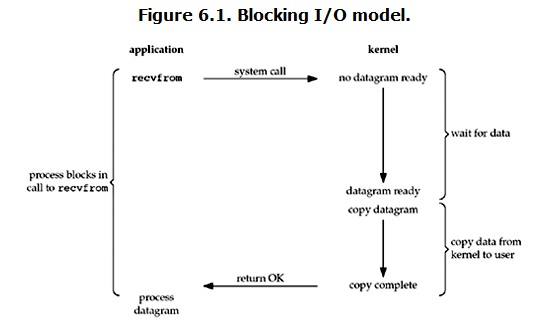
使用BIO则数据准备和数据从内核空间拷贝到用户空间两个阶段都是阻塞的。
![blocking-io]()
BIO使用案例
public class EchoServer {
    public static void main(String[] args) throws IOException {
        ServerSocket serverSocket = new ServerSocket(8080);
        while (true) {
            System.out.println("start accept");
            Socket socket = serverSocket.accept();
            System.out.println("new conn: " + socket.getRemoteSocketAddress());

            new Thread(()->{
                try {
                    BufferedReader reader = new BufferedReader(new InputStreamReader(socket.getInputStream()));
                    String msg;
                    // 读取消息,本文来源公从号彤哥读源码
                    while ((msg = reader.readLine()) != null) {
                        if (msg.equalsIgnoreCase("quit")) {
                            reader.close();
                            socket.close();
                            break;
                        } else {
                            System.out.println("receive msg: " + msg);
                        }
                    }
                } catch (IOException e) {
                    e.printStackTrace();
                }
            }).start();
        }
    }
}
客户端可以使用telnet来测试,而且你可以使用多个telnet来测试:
[c:\~]$ telnet 127.0.0.1 8080


Connecting to 127.0.0.1:8080...
Connection established.
To escape to local shell, press 'Ctrl+Alt+]'.
hello world
我是人才
quit
Connection closed by foreign host.
BIO的使用方式非常简单,服务端接收到一个连接就启动一个线程来处理这个连接的所有请求。
![bio_nio_aio]()
所以,BIO最大的缺点就是浪费资源,只能处理少量的连接,线程数随着连接数线性增加,连接越多线程越多,直到抗不住。
Java NIO
NIO概念解析
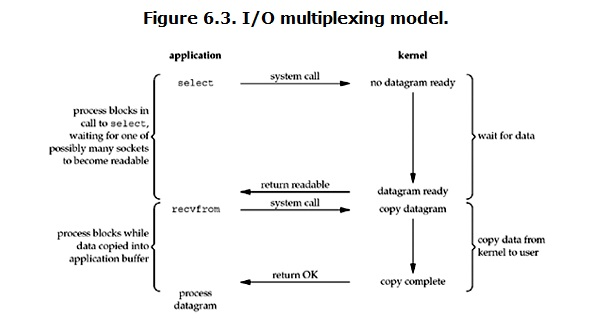
NIO,New IO,JDK1.4开始支持,内部是基于多路复用的IO模型。
![multiplexing-io]()
这里有个歧义,很多人认为Java的NIO是Non-Blocking IO的缩写,其实并不是。
使用NIO则多条连接的数据准备阶段会阻塞在select上,数据从内核空间拷贝到用户空间依然是阻塞的。
因为第一阶段并不是连接本身处于阻塞阶段,所以通常来说NIO也可以看作是同步非阻塞IO。
NIO使用案例
public class EchoServer {
    public static void main(String[] args) throws IOException {
        Selector selector = Selector.open();
        ServerSocketChannel serverSocketChannel = ServerSocketChannel.open();
        serverSocketChannel.bind(new InetSocketAddress(8080));
        serverSocketChannel.configureBlocking(false);
        // 将accept事件绑定到selector上
        serverSocketChannel.register(selector, SelectionKey.OP_ACCEPT);

        while (true) {
            // 阻塞在select上
            selector.select();
            Set<SelectionKey> selectionKeys = selector.selectedKeys();
            // 遍历selectKeys
            Iterator<SelectionKey> iterator = selectionKeys.iterator();
            while (iterator.hasNext()) {
                SelectionKey selectionKey = iterator.next();
                // 如果是accept事件
                if (selectionKey.isAcceptable()) {
                    ServerSocketChannel ssc = (ServerSocketChannel) selectionKey.channel();
                    SocketChannel socketChannel = ssc.accept();
                    System.out.println("accept new conn: " + socketChannel.getRemoteAddress());
                    socketChannel.configureBlocking(false);
                    socketChannel.register(selector, SelectionKey.OP_READ);
                } else if (selectionKey.isReadable()) {
                    // 如果是读取事件,本文来源公从号彤哥读源码
                    SocketChannel socketChannel = (SocketChannel) selectionKey.channel();
                    ByteBuffer buffer = ByteBuffer.allocate(1024);
                    // 将数据读入到buffer中
                    int length = socketChannel.read(buffer);
                    if (length > 0) {
                        buffer.flip();
                        byte[] bytes = new byte[buffer.remaining()];
                        // 将数据读入到byte数组中
                        buffer.get(bytes);

                        // 换行符会跟着消息一起传过来
                        String content = new String(bytes, "UTF-8").replace("\r\n", "");
                        if (content.equalsIgnoreCase("quit")) {
                            selectionKey.cancel();
                            socketChannel.close();
                        } else {
                            System.out.println("receive msg: " + content);
                        }
                    }
                }
                iterator.remove();
            }
        }
    }
}
这里同样使用telnet测试,而且你可以使用多个telnet来测试:
[c:\~]$ telnet 127.0.0.1 8080


Connecting to 127.0.0.1:8080...
Connection established.
To escape to local shell, press 'Ctrl+Alt+]'.
hello world
我是人才
quit
Connection closed by foreign host.
NIO的使用方式就有点复杂了,但是一个线程就可以处理很多连接。
首先,需要注册一个ServerSocketChannel并把它注册到selector上并监听accept事件,然后accept到连接后会获取到SocketChannel,同样把SocketChannel也注册到selector上,但是监听的是read事件。
![bio_nio_aio]()
NIO最大的优点,就是一个线程就可以处理大量的连接,缺点是不适合处理阻塞性任务,因为阻塞性任务会把这个线程占有着,其它连接的请求将得不到及时处理。
Java AIO
AIO概念介绍
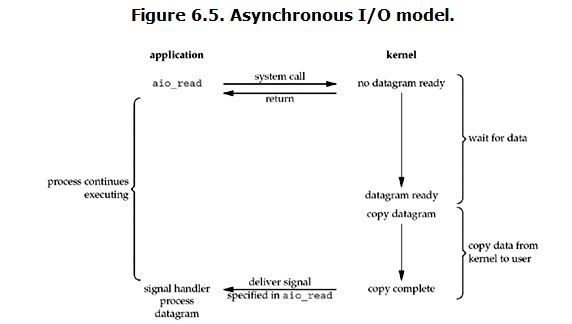
AIO,Asynchronous IO,异步IO,JDK1.7开始支持,算是一种比较完美的IO,Windows下比较成熟,但Linux下还不太成熟。
![asynchronous-io]()
使用异步IO则会在请求时立即返回,并在数据已准备且已拷贝到用户空间后进行回调处理,两个阶段都不会阻塞。
AIO使用案例
public class EchoServer {
    public static void main(String[] args) throws IOException {
        AsynchronousServerSocketChannel serverSocketChannel = AsynchronousServerSocketChannel.open();
        serverSocketChannel.bind(new InetSocketAddress(8080));
        // 监听accept事件,本文来源公从号彤哥读源码
        serverSocketChannel.accept(null, new CompletionHandler<AsynchronousSocketChannel, Object>() {
            @Override
            public void completed(AsynchronousSocketChannel socketChannel, Object attachment) {
                try {
                    System.out.println("accept new conn: " + socketChannel.getRemoteAddress());
                    // 再次监听accept事件
                    serverSocketChannel.accept(null, this);

                    // 消息的处理
                    while (true) {
                        ByteBuffer buffer = ByteBuffer.allocate(1024);
                        // 将数据读入到buffer中
                        Future<Integer> future = socketChannel.read(buffer);
                        if (future.get() > 0) {
                            buffer.flip();
                            byte[] bytes = new byte[buffer.remaining()];
                            // 将数据读入到byte数组中
                            buffer.get(bytes);

                            String content = new String(bytes, "UTF-8");
                            // 换行符会当成另一条消息传过来
                            if (content.equals("\r\n")) {
                                continue;
                            }
                            if (content.equalsIgnoreCase("quit")) {
                                socketChannel.close();
                                break;
                            } else {
                                System.out.println("receive msg: " + content);
                            }
                        }
                    }
                } catch (Exception e) {
                    e.printStackTrace();
                }
            }

            @Override
            public void failed(Throwable exc, Object attachment) {
                System.out.println("failed");
            }
        });

        // 阻塞住主线程
        System.in.read();
    }
}
这里同样使用telnet测试,而且你可以使用多个telnet来测试:
[c:\~]$ telnet 127.0.0.1 8080


Connecting to 127.0.0.1:8080...
Connection established.
To escape to local shell, press 'Ctrl+Alt+]'.
hello world
我是人才
quit
Connection closed by foreign host.
AIO的使用方式不算太复杂,默认会启一组线程来处理用户的请求,而且如果在处理阻塞性任务,还会自动增加新的线程来处理其它连接的任务。
首先,创建一个AsynchronousServerSocketChannel并调用其accept方法,这一步相当于监听了accept事件,在收到accept事件后会获取到AsynchronousSocketChannel,然后就可以在回调方法completed()里面读取数据了,当然也要继续监听accept事件。
AIO最大的优点,就是少量的线程就可以处理大量的连接,而且可以处理阻塞性任务,但不能大量阻塞,否则线程数量会膨胀。
槽点
(1)三种IO的实现方式中对于换行符的处理竟然都不一样,BIO中不会把换行符带过来(其实是带过来了,因为用了readLine()方法,所以换行符没了),NIO中会把换行符加在消息末尾,AIO中会把换行符当成一条新的消息传过来,很神奇,为啥不统一处理呢,也很疑惑。
(2)JDK自带的ByteBuffer是一个难用的东西。
总结
本文我们从概念和使用两个角度分别介绍了BIO/NIO/AIO三种IO模型。
问题
看起来JDK的实现似乎很完美啊,为什么还会有Netty呢?
最后,也欢迎来我的公从号彤哥读源码系统地学习源码&架构的知识。
![code]()