版权声明:本文为博主原创文章,转载请标明出处。 https://blog.csdn.net/chaoyu168/article/details/72026841
通过对系统提供的控件进行组合,不用写新的类不用继承系统的控件也能实现自定义控件的效果。下面是一个简单的例子:
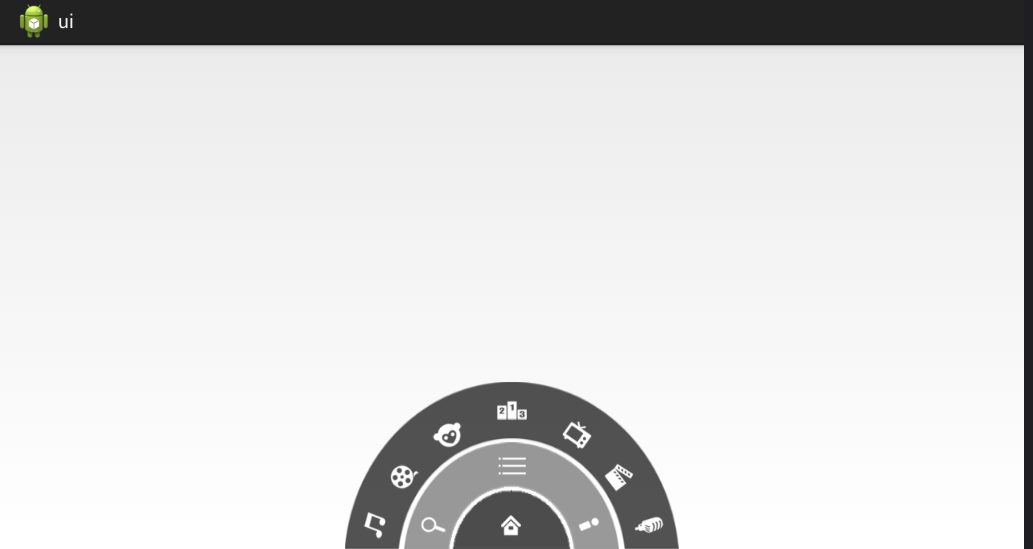
效果图:
![]()
主函数:
import android.os.Bundle;
import android.app.Activity;
import android.util.Log;
import android.view.KeyEvent;
import android.view.Menu;
import android.view.View;
import android.view.View.OnClickListener;
import android.widget.ImageView;
import android.widget.RelativeLayout;

public class MainActivity extends Activity implements OnClickListener{
	private String tag = MainActivity.class.getSimpleName();
	private ImageView iv_home,iv_menu;
	private RelativeLayout level1,level2,level3;

	private boolean isShowLevel2 = true;//是否显示2级菜单
	private boolean isShowLevel3 = true;//是否显示3级菜单

	private boolean isShowMenu = true;//是否显示整个菜单,包括1级,2级,3级的菜单
	@Override
	protected void onCreate(Bundle savedInstanceState) {
		super.onCreate(savedInstanceState);
		initView();
		initListener();
	}

	private void initView() {
		setContentView(R.layout.activity_main);
		iv_home = (ImageView) findViewById(R.id.iv_home);
		iv_menu = (ImageView) findViewById(R.id.iv_menu);
		level1 = (RelativeLayout) findViewById(R.id.level1);
		level2 = (RelativeLayout) findViewById(R.id.level2);
		level3 = (RelativeLayout) findViewById(R.id.level3);
	}

	private void initListener() {
		iv_home.setOnClickListener(this);
		iv_menu.setOnClickListener(this);
	}

	@Override
	public boolean onKeyDown(int keyCode, KeyEvent event) {
		if(keyCode==KeyEvent.KEYCODE_MENU){

			if(isShowMenu){
				//需要关闭所有菜单
				int startOffset = 0;
				if(isShowLevel3){
					AnimUtil.closeMenu(level3, startOffset);
					isShowLevel3 = false;
					startOffset += 200;
				}
				if(isShowLevel2){
					AnimUtil.closeMenu(level2, startOffset);
					isShowLevel2 = false;
					startOffset += 200;
				}

				AnimUtil.closeMenu(level1, startOffset);

			}else {
				//需要显示所有菜单
				AnimUtil.showMenu(level1,0);
				AnimUtil.showMenu(level2,200);
				isShowLevel2 = true;
				AnimUtil.showMenu(level3,400);
				isShowLevel3 = true;

			}
			isShowMenu = !isShowMenu;

			return true;
		}
		return super.onKeyDown(keyCode, event);
	}

	@Override
	public void onClick(View v) {
		switch (v.getId()) {
		case R.id.iv_home:
			if(AnimUtil.animCount!=0){
				//说明有动画在执行
				return;
			}
			if(isShowLevel2){
				//需要隐藏
				int startOffset = 0;
				if(isShowLevel3){
					AnimUtil.closeMenu(level3,startOffset);
					startOffset += 200;
					isShowLevel3 = false;
				}

				AnimUtil.closeMenu(level2,startOffset);
			}else{
				//需要显示
//				Log.e(tag, "执行显示操作");
				AnimUtil.showMenu(level2,0);
			}
			isShowLevel2 = !isShowLevel2;
			break;
		case R.id.iv_menu:
			if(AnimUtil.animCount!=0){
				//说明有动画在执行
				return;
			}
			if(isShowLevel3){
				//隐藏3级菜单
				AnimUtil.closeMenu(level3,0);
			}else {
				//显示3级菜单
				AnimUtil.showMenu(level3,0);
			}
			isShowLevel3 = !isShowLevel3;
			break;
		default:
			break;
		}
	}


}
import android.view.animation.Animation;
import android.view.animation.Animation.AnimationListener;
import android.view.animation.RotateAnimation;
import android.widget.RelativeLayout;

public class AnimUtil {
	public static int animCount = 0;//记录当前执行的动画数量
	public static void closeMenu(RelativeLayout rl,int startOffset){
		for (int i = 0; i < rl.getChildCount(); i++) {
			rl.getChildAt(i).setEnabled(false);
		}

		//pivotXValue: 0-1
		RotateAnimation animation = new RotateAnimation(0, -180,
				RotateAnimation.RELATIVE_TO_SELF, 0.5f,
				RotateAnimation.RELATIVE_TO_SELF, 1);
		animation.setDuration(500);
		animation.setFillAfter(true);//动画结束后保持当时的状态
		animation.setStartOffset(startOffset);

		animation.setAnimationListener(new MyAnimationListener());

		rl.startAnimation(animation);
	}

	public static void showMenu(RelativeLayout rl,int startOffset){
		for (int i = 0; i < rl.getChildCount(); i++) {
			rl.getChildAt(i).setEnabled(true);
		}

		RotateAnimation animation = new RotateAnimation(-180, 0,
				RotateAnimation.RELATIVE_TO_SELF, 0.5f,
				RotateAnimation.RELATIVE_TO_SELF, 1);
		animation.setDuration(500);
		animation.setFillAfter(true);//动画结束后保持当时的状态
		animation.setStartOffset(startOffset);

		animation.setAnimationListener(new MyAnimationListener());

		rl.startAnimation(animation);
	}

	static class MyAnimationListener implements AnimationListener{
		@Override
		public void onAnimationStart(Animation animation) {
			animCount++;
		}
		@Override
		public void onAnimationEnd(Animation animation) {
			animCount--;
		}
		@Override
		public void onAnimationRepeat(Animation animation) {
		}

	}
}
布局文件:
<RelativeLayout xmlns:android="http://schemas.android.com/apk/res/android"
    xmlns:tools="http://schemas.android.com/tools"
    android:layout_width="match_parent"
    android:layout_height="match_parent"
     >

    <!-- 一级菜单 -->
    <RelativeLayout android:layout_width="100dp"
        android:background="@drawable/level1"
        android:layout_alignParentBottom="true"
        android:id="@+id/level1"
        android:layout_centerHorizontal="true"
        android:layout_height="50dp">

        <ImageView
            android:layout_width="wrap_content"
            android:layout_height="wrap_content"
            android:layout_centerInParent="true"
            android:id="@+id/iv_home"
            android:background="@drawable/icon_home"/>

    </RelativeLayout>

     <!-- 二级菜单 -->
    <RelativeLayout android:layout_width="180dp"
        android:layout_height="90dp"
        android:id="@+id/level2"
        android:layout_alignParentBottom="true"
        android:layout_centerHorizontal="true"
        android:background="@drawable/level2">

        <ImageView android:layout_width="wrap_content"
            android:layout_height="wrap_content"
            android:layout_alignParentBottom="true"
            android:layout_marginBottom="10dp"
            android:layout_marginLeft="10dp"
            android:background="@drawable/icon_search"/>

         <ImageView android:layout_width="wrap_content"
            android:layout_height="wrap_content"
            android:layout_alignParentBottom="true"
            android:layout_alignParentRight="true"
            android:layout_marginBottom="10dp"
            android:layout_marginRight="10dp"
            android:background="@drawable/icon_myyouku"/>

         <ImageView android:layout_width="wrap_content"
             android:layout_height="wrap_content"
             android:layout_marginTop="5dp"
             android:id="@+id/iv_menu"
             android:background="@drawable/icon_menu"
             android:layout_centerHorizontal="true"/>

    </RelativeLayout>

    <RelativeLayout android:layout_width="280dp"
        android:layout_height="142dp"
        android:id="@+id/level3"
        android:layout_alignParentBottom="true"
        android:layout_centerHorizontal="true"
        android:background="@drawable/level3">


        <ImageView android:layout_width="wrap_content"
            android:layout_height="wrap_content"
            android:layout_alignParentBottom="true"
            android:layout_marginBottom="15dp"
            android:layout_marginLeft="12dp"
            android:background="@drawable/channel1"
            />

        <ImageView android:layout_width="wrap_content"
            android:layout_height="wrap_content"
            android:layout_alignParentBottom="true"
            android:layout_marginBottom="15dp"
            android:layout_alignParentRight="true"
            android:layout_marginRight="12dp"
            android:background="@drawable/channel5"
            />

         <ImageView android:layout_width="wrap_content"
            android:layout_height="wrap_content"
            android:layout_alignParentBottom="true"
            android:layout_marginBottom="55dp"
            android:layout_marginLeft="32dp"
            android:background="@drawable/channel2"
            />

          <ImageView android:layout_width="wrap_content"
            android:layout_height="wrap_content"
            android:layout_alignParentBottom="true"
            android:layout_alignParentRight="true"
            android:layout_marginBottom="55dp"
            android:layout_marginRight="32dp"
            android:background="@drawable/channel6"
            />

            <ImageView android:layout_width="wrap_content"
            android:layout_height="wrap_content"
            android:layout_alignParentBottom="true"
            android:layout_marginBottom="85dp"
            android:layout_marginLeft="62dp"
            android:background="@drawable/channel3"
            />

             <ImageView android:layout_width="wrap_content"
            android:layout_height="wrap_content"
            android:layout_alignParentRight="true"
            android:layout_alignParentBottom="true"
            android:layout_marginBottom="85dp"
            android:background="@drawable/channel7"
            android:layout_marginRight="62dp"
            />

             <ImageView android:layout_width="wrap_content"
                 android:layout_height="wrap_content"
                 android:layout_marginTop="5dp"
                 android:layout_centerHorizontal="true"
                 android:background="@drawable/channel4"/>

    </RelativeLayout>
</RelativeLayout>