作者:运维有术
前言
知识点
- 定级:入门级
- KubeKey 如何升级 Kubernetes 次要版本
- Kubernetes 升级准备及验证
- KubeKey 升级 Kubernetes 的常见问题
实战服务器配置 (架构 1:1 复刻小规模生产环境,配置略有不同)
| 主机名 |
IP |
CPU |
内存 |
系统盘 |
数据盘 |
用途 |
| k8s-master-1 |
192.168.9.91 |
4 |
16 |
40 |
100 |
KubeSphere/k8s-master |
| k8s-master-2 |
192.168.9.92 |
4 |
16 |
40 |
100 |
KubeSphere/k8s-master |
| k8s-master-3 |
192.168.9.93 |
4 |
16 |
40 |
100 |
KubeSphere/k8s-master |
| k8s-worker-1 |
192.168.9.95 |
8 |
16 |
40 |
100 |
k8s-worker/CI |
| k8s-worker-2 |
192.168.9.96 |
8 |
16 |
40 |
100 |
k8s-worker |
| k8s-worker-3 |
192.168.9.97 |
8 |
16 |
40 |
100 |
k8s-worker |
| k8s-storage-1 |
192.168.9.81 |
4 |
16 |
40 |
100/100/100/100/100 |
ElasticSearch/GlusterFS/Ceph-Rook/Longhorn/NFS/ |
| k8s-storage-2 |
192.168.9.82 |
4 |
16 |
40 |
100/100/100/100 |
ElasticSearch/GlusterFS/Ceph-Rook/Longhorn/ |
| k8s-storage-3 |
192.168.9.83 |
4 |
16 |
40 |
100/100/100/100 |
ElasticSearch/GlusterFS/Ceph-Rook/Longhorn/ |
| registry |
192.168.9.80 |
4 |
8 |
40 |
100 |
Sonatype Nexus 3 |
| 合计 |
10 |
52 |
152 |
400 |
2000 |
|
实战环境涉及软件版本信息
- 操作系统:CentOS 7.9 x86_64
- KubeSphere:v3.4.1
- Kubernetes:v1.24.14 to v1.26.5
- Containerd:1.6.4
- KubeKey: v3.0.13
1. 简介
上一期我们完成了 KubeSphere 和 Kubernetes 补丁版本升级实战 , 本期我们实战如何利用 KubeKey 实现 Kubernetes 次要版本升级。
本期内容没有涉及 KubeSphere 的次要版本升级,有需要的读者可以参考对应版本的官方升级文档。
关于跨次要版本升级,个人的考虑如下:
- 无论是 KubeSphere 还是 Kubernetes 非必要不升级(风险高,不可控的因素太多,就算是提前做了充分的验证测试,谁敢保证生产升级不出意外?)
- Kubernetes 非必要不原地升级,建议采用“建设新版本集群 + 迁移业务应用”或是蓝绿升级 的方案
- 一定要原地升级尽量控制在 2 个次要版本之内,且要做好充分的调研验证(比如版本不同、API 不同造成的资源兼容性,升级失败的爆炸半径等)
- KubeSphere 的跨版本升级更复杂,启用的额外插件越多,涉及的组件和中间价越多,升级需要考虑验证的点也就越多
KubeKey 支持 All-in-One 集群和多节点集群两种升级场景,本文只实战演示多节点集群的升级场景, All-in-One 集群请参考官方升级指南。
KubeSphere 和 Kubernetes 次要版本升级流程与补丁版本升级流程一致,这里就不过多描述了,详情请看上文。
2. 升级实战前提条件
上一期我们完成了 Kubernetes v1.24.12 到 v1.24.14 升级,本期实战我们将基于同一套环境将 Kubernetes v1.24.14 升级到 v1.26.5。
同时,为了模拟真实的业务场景,我们继续创建一些测试资源。在验证之前,我们还需要记录当前集群的一些关键信息。
2.1 集群环境
- KubeSphere v3.4.1,并启用大部分插件
- 安装 v1.24.14 的 Kubernetes 集群
- 对接 NFS 存储或是其他存储作为持久化存储(本文测试环境选用 NFS)
2.2 查看当前集群环境信息
下面查看的当前集群环境信息并不充分,只是查看几个具有代表性的资源,肯定有被忽略的组件和信息。
[root@k8s-master-1 ~]# kubectl get nodes -o wide
NAME           STATUS   ROLES                  AGE     VERSION    INTERNAL-IP    EXTERNAL-IP   OS-IMAGE                KERNEL-VERSION                CONTAINER-RUNTIME
k8s-master-1   Ready    control-plane          6d21h   v1.24.14   192.168.9.91   <none>        CentOS Linux 7 (Core)   5.4.261-1.el7.elrepo.x86_64   containerd://1.6.4
k8s-master-2   Ready    control-plane,worker   6d21h   v1.24.14   192.168.9.92   <none>        CentOS Linux 7 (Core)   5.4.261-1.el7.elrepo.x86_64   containerd://1.6.4
k8s-master-3   Ready    control-plane,worker   6d21h   v1.24.14   192.168.9.93   <none>        CentOS Linux 7 (Core)   5.4.261-1.el7.elrepo.x86_64   containerd://1.6.4
k8s-worker-1   Ready    worker                 6d21h   v1.24.14   192.168.9.95   <none>        CentOS Linux 7 (Core)   5.4.261-1.el7.elrepo.x86_64   containerd://1.6.4
k8s-worker-2   Ready    worker                 6d21h   v1.24.14   192.168.9.96   <none>        CentOS Linux 7 (Core)   5.4.261-1.el7.elrepo.x86_64   containerd://1.6.4
k8s-worker-3   Ready    worker                 6d19h   v1.24.14   192.168.9.97   <none>        CentOS Linux 7 (Core)   5.4.261-1.el7.elrepo.x86_64   containerd://1.6.4
- 查看所有的 Deployment 使用的 Image,方便升级后对比(仅作为记录,实际意义不大,结果中不包含 Kubernetes 核心组件)
# 受限于篇幅,输出结果略,请自己保存结果
kubectl get deploy -A -o wide
- 查看 Kubernetes 资源(受限于篇幅,不展示 pod 结果)
[root@k8s-master-1 ~]# kubectl get pods,deployment,sts,ds -o wide -n kube-system
NAME                                          READY   UP-TO-DATE   AVAILABLE   AGE     CONTAINERS                     IMAGES                                                                    SELECTOR
deployment.apps/calico-kube-controllers       1/1     1            1           6d21h   calico-kube-controllers        registry.cn-beijing.aliyuncs.com/kubesphereio/kube-controllers:v3.26.1    k8s-app=calico-kube-controllers
deployment.apps/coredns                       2/2     2            2           6d21h   coredns                        registry.cn-beijing.aliyuncs.com/kubesphereio/coredns:1.8.6               k8s-app=kube-dns
deployment.apps/metrics-server                1/1     1            1           6d21h   metrics-server                 registry.cn-beijing.aliyuncs.com/kubesphereio/metrics-server:v0.4.2       k8s-app=metrics-server
deployment.apps/openebs-localpv-provisioner   1/1     1            1           6d21h   openebs-provisioner-hostpath   registry.cn-beijing.aliyuncs.com/kubesphereio/provisioner-localpv:3.3.0   name=openebs-localpv-provisioner,openebs.io/component-name=openebs-localpv-provisioner

NAME                                   READY   AGE     CONTAINERS            IMAGES
statefulset.apps/snapshot-controller   1/1     6d21h   snapshot-controller   registry.cn-beijing.aliyuncs.com/kubesphereio/snapshot-controller:v4.0.0

NAME                          DESIRED   CURRENT   READY   UP-TO-DATE   AVAILABLE   NODE SELECTOR            AGE     CONTAINERS    IMAGES                                                                     SELECTOR
daemonset.apps/calico-node    6         6         6       6            6           kubernetes.io/os=linux   6d21h   calico-node   registry.cn-beijing.aliyuncs.com/kubesphereio/node:v3.26.1                 k8s-app=calico-node
daemonset.apps/kube-proxy     6         6         6       6            6           kubernetes.io/os=linux   6d21h   kube-proxy    registry.cn-beijing.aliyuncs.com/kubesphereio/kube-proxy:v1.24.14          k8s-app=kube-proxy
daemonset.apps/nodelocaldns   6         6         6       6            6           <none>                   6d21h   node-cache    registry.cn-beijing.aliyuncs.com/kubesphereio/k8s-dns-node-cache:1.15.12   k8s-app=nodelocaldns
- 查看当前 Master 和 Worker 节点使用的 Image
# Master
[root@k8s-master-1 ~]#  crictl images | grep v1.24.14
registry.cn-beijing.aliyuncs.com/kubesphereio/kube-apiserver            v1.24.14            b651b48a617a5       34.3MB
registry.cn-beijing.aliyuncs.com/kubesphereio/kube-controller-manager   v1.24.14            d40212fa9cf04       31.5MB
registry.cn-beijing.aliyuncs.com/kubesphereio/kube-proxy                v1.24.14            e57c0d007d1ef       39.7MB
registry.cn-beijing.aliyuncs.com/kubesphereio/kube-scheduler            v1.24.14            19bf7b80c50e5       15.8MB

# Worker
[root@k8s-worker-1 ~]# crictl images | grep v1.24.14
registry.cn-beijing.aliyuncs.com/kubesphereio/kube-proxy                      v1.24.14                       e57c0d007d1ef       39.7MB
- 查看 Kubernetes 核心组件二进制文件(记录比对是否有升级)
[root@k8s-master-1 ~]# ll /usr/local/bin/
total 352448
-rwxr-xr-x 1 root root  65770992 Dec  4 15:09 calicoctl
-rwxr-xr-x 1 root root  23847904 Nov 29 13:50 etcd
-rwxr-xr-x 1 kube root  17620576 Nov 29 13:50 etcdctl
-rwxr-xr-x 1 root root  46182400 Dec  4 15:09 helm
-rwxr-xr-x 1 root root  44748800 Dec  4 15:09 kubeadm
-rwxr-xr-x 1 root root  46080000 Dec  4 15:09 kubectl
-rwxr-xr-x 1 root root 116646168 Dec  4 15:09 kubelet
drwxr-xr-x 2 kube root        71 Nov 29 13:51 kube-scripts
2.3 创建测试验证资源
kubectl create ns upgrade-test
- 创建测试资源文件(使用 StatefulSet,便于快速创建对应的测试卷),使用镜像 nginx:latest 创建 1 个 6 副本的测试业务(包含 pvc),每个副本分布在 1 台 Worker 节点,
vi nginx-test.yaml
apiVersion: apps/v1
kind: StatefulSet
metadata:
  name: test-nginx
  namespace: upgrade-test
spec:
  selector:
    matchLabels:
      app: nginx
  serviceName: "nginx"
  replicas: 6
  template:
    metadata:
      labels:
        app: nginx
    spec:
      containers:
      - name: nginx
        image: nginx:latest
        ports:
        - containerPort: 80
          name: web
        volumeMounts:
        - name: nfs-volume
          mountPath: /usr/share/nginx/html
  volumeClaimTemplates:
  - metadata:
      name: nfs-volume
    spec:
      accessModes: [ "ReadWriteOnce" ]
      storageClassName: "nfs-sc"
      resources:
        requests:
          storage: 1Gi
kubectl apply -f nginx-test.yaml
for id in $(seq 0 1 5);do kubectl exec -it test-nginx-$id -n upgrade-test -- sh -c "echo I test-nginx-$id > /usr/share/nginx/html/index.html";done
# 查看 Pod(每个节点一个副本)
[root@k8s-master-1 ~]# kubectl get pods -o wide -n upgrade-test
NAME           READY   STATUS    RESTARTS   AGE     IP              NODE           NOMINATED NODE   READINESS GATES
test-nginx-0   1/1     Running   0          8m32s   10.233.80.77    k8s-master-1   <none>           <none>
test-nginx-1   1/1     Running   0          8m10s   10.233.96.33    k8s-master-3   <none>           <none>
test-nginx-2   1/1     Running   0          7m47s   10.233.85.99    k8s-master-2   <none>           <none>
test-nginx-3   1/1     Running   0          7m25s   10.233.87.104   k8s-worker-3   <none>           <none>
test-nginx-4   1/1     Running   0          7m3s    10.233.88.180   k8s-worker-1   <none>           <none>
test-nginx-5   1/1     Running   0          6m41s   10.233.74.129   k8s-worker-2   <none>           <none>

# 查看 PVC
[root@k8s-master-1 ~]# kubectl get pvc -o wide -n upgrade-test
NAME                      STATUS   VOLUME                                     CAPACITY   ACCESS MODES   STORAGECLASS   AGE     VOLUMEMODE
nfs-volume-test-nginx-0   Bound    pvc-e7875a9c-2736-4b32-aa29-b338959bb133   1Gi        RWO            nfs-sc         8m52s   Filesystem
nfs-volume-test-nginx-1   Bound    pvc-8bd760a8-64f9-40e9-947f-917b6308c146   1Gi        RWO            nfs-sc         8m30s   Filesystem
nfs-volume-test-nginx-2   Bound    pvc-afb47509-c249-4892-91ad-da0f69e33495   1Gi        RWO            nfs-sc         8m7s    Filesystem
nfs-volume-test-nginx-3   Bound    pvc-e6cf5935-2852-4ef6-af3d-a06458bceb49   1Gi        RWO            nfs-sc         7m45s   Filesystem
nfs-volume-test-nginx-4   Bound    pvc-7d176238-8106-4cc9-b49d-fceb25242aee   1Gi        RWO            nfs-sc         7m23s   Filesystem
nfs-volume-test-nginx-5   Bound    pvc-dc35e933-0b3c-4fb9-9736-78528d26ce6f   1Gi        RWO            nfs-sc         7m1s    Filesystem

# 查看 index.html
[root@k8s-master-1 ~]# for id in $(seq 0 1 5);do kubectl exec -it test-nginx-$id -n upgrade-test  -- cat /usr/share/nginx/html/index.html;done
I test-nginx-0
I test-nginx-1
I test-nginx-2
I test-nginx-3
I test-nginx-4
I test-nginx-5
2.4 升级时观测集群和业务状态
本文的观测并不一定全面充分,所以各位在实际升级验证测试时,需要根据真实环境补充。观测过程不便截图,请读者自行观察。
watch kubectl get nodes
- 观查测试命名空间的资源状态(重点观察 RESTARTS 是否变化)
watch kubectl get pods -o wide -n upgrade-test
- ping 测模拟的业务 IP(随机找一个 Pod)
ping 10.233.80.77
- curl 模拟的业务 IP(随机找一个 Pod,跟 Ping 测的不同)
watch curl 10.233.88.180
- 观测模拟的业务磁盘挂载情况(没验证写入,重点观察输出结果是否有 nfs 存储)
watch kubectl exec -it test-nginx-3 -n upgrade-test -- df -h
3. 下载 KubeKey
升级集群前执行以下命令,下载最新版或是指定版本的 KubeKey。
export KKZONE=cn
curl -sfL https://get-kk.kubesphere.io | VERSION=v3.0.13 sh -
4. 生成集群部署配置文件
4.1 使用 KubeKey 生成配置文件
升级之前需要准备集群部署文件,首选,建议使用 KubeKey 部署 KubeSphere 和 Kubernetes 集群时使用的配置文件。
如果部署时使用的配置丢失,可以执行以下命令,基于现有集群创建一个 sample.yaml 配置文件(本文重点演示)。
./kk create config --from-cluster
备注 :
本文假设 kubeconfig 位于 ~/.kube/config。您可以通过 --kubeconfig 标志进行修改。
实际命令执行结果如下:
[root@k8s-master-1 kubekey]# ./kk create config --from-cluster
Notice: /root/kubekey/sample.yaml has been created. Some parameters need to be filled in by yourself, please complete it.
生成的配置文件 sample.yaml
apiVersion: kubekey.kubesphere.io/v1alpha2
kind: Cluster
metadata:
  name: sample
spec:
  hosts:
  ##You should complete the ssh information of the hosts
  - {name: k8s-master-1, address: 192.168.9.91, internalAddress: 192.168.9.91}
  - {name: k8s-master-2, address: 192.168.9.92, internalAddress: 192.168.9.92}
  - {name: k8s-master-3, address: 192.168.9.93, internalAddress: 192.168.9.93}
  - {name: k8s-worker-1, address: 192.168.9.95, internalAddress: 192.168.9.95}
  - {name: k8s-worker-2, address: 192.168.9.96, internalAddress: 192.168.9.96}
  - {name: k8s-worker-3, address: 192.168.9.97, internalAddress: 192.168.9.97}
  roleGroups:
    etcd:
    - SHOULD_BE_REPLACED
    master:
    worker:
    - k8s-master-1
    - k8s-master-2
    - k8s-master-3
    - k8s-worker-1
    - k8s-worker-2
    - k8s-worker-3
  controlPlaneEndpoint:
    ##Internal loadbalancer for apiservers
    #internalLoadbalancer: haproxy

    ##If the external loadbalancer was used, 'address' should be set to loadbalancer's ip.
    domain: lb.opsman.top
    address: ""
    port: 6443
  kubernetes:
    version: v1.24.14
    clusterName: opsman.top
    proxyMode: ipvs
    masqueradeAll: false
    maxPods: 110
    nodeCidrMaskSize: 24
  network:
    plugin: calico
    kubePodsCIDR: 10.233.64.0/18
    kubeServiceCIDR: 10.233.0.0/18
  registry:
    privateRegistry: ""
4.2 修改配置文件模板
根据实际的集群配置修改 sample.yaml 文件,请确保正确修改以下字段。
hosts:您主机的基本信息(主机名和 IP 地址)以及使用 SSH 连接至主机的信息(重点修改,需要加入 SSH 用户名和密码)。roleGroups.etcd:etcd 节点(重点修改)。roleGroups.master:master 节点(重点修改,默认没生成,必须手动加入否则会报错,参见 常见问题 1),注意: 该参数字段在部署时生成的配置文件中的名称为 roleGroups.control-plane。roleGroups.worker:worker 节点(核对修改)。controlPlaneEndpoint:负载均衡器信息(可选)。kubernetes.containerManager:修改容器运行时(必选,默认没生成,必须手动加入否则会报错,参见 常见问题 2)registry:镜像服务信息(可选)。
修改后文件内容:
apiVersion: kubekey.kubesphere.io/v1alpha2
kind: Cluster
metadata:
  name: sample
spec:
  hosts:
  ##You should complete the ssh information of the hosts
  - {name: k8s-master-1, address: 192.168.9.91, internalAddress: 192.168.9.91, user: root, password: "P@88w0rd"}
  - {name: k8s-master-2, address: 192.168.9.92, internalAddress: 192.168.9.92, user: root, password: "P@88w0rd"}
  - {name: k8s-master-3, address: 192.168.9.93, internalAddress: 192.168.9.93, user: root, password: "P@88w0rd"}
  - {name: k8s-worker-1, address: 192.168.9.95, internalAddress: 192.168.9.95, user: root, password: "P@88w0rd"}
  - {name: k8s-worker-2, address: 192.168.9.96, internalAddress: 192.168.9.96, user: root, password: "P@88w0rd"}
  - {name: k8s-worker-3, address: 192.168.9.97, internalAddress: 192.168.9.97, user: root, password: "P@88w0rd"}
  roleGroups:
    etcd:
    - k8s-master-1
    - k8s-master-2
    - k8s-master-3
    master:
    - k8s-master-1
    - k8s-master-2
    - k8s-master-3
    worker:
    - k8s-master-1
    - k8s-master-2
    - k8s-master-3
    - k8s-worker-1
    - k8s-worker-2
    - k8s-worker-3
  controlPlaneEndpoint:
    ##Internal loadbalancer for apiservers
    internalLoadbalancer: haproxy

    ##If the external loadbalancer was used, 'address' should be set to loadbalancer's ip.
    domain: lb.opsman.top
    address: ""
    port: 6443
  kubernetes:
    version: v1.24.12
    clusterName: opsman.top
    proxyMode: ipvs
    masqueradeAll: false
    maxPods: 110
    nodeCidrMaskSize: 24
    containerManager: containerd
  network:
    plugin: calico
    kubePodsCIDR: 10.233.64.0/18
    kubeServiceCIDR: 10.233.0.0/18
  registry:
    privateRegistry: ""
5. 升级 Kubernetes
5.1 升级 Kubernetes
执行以下命令,将 Kubernetes 从 v1.24.14 升级至 v1.26.5。
export KKZONE=cn
./kk upgrade --with-kubernetes v1.26.5 -f sample.yaml
执行后的结果如下(按提示输入 yes 继续):
[root@k8s-master-1 kubekey]# ./kk upgrade --with-kubernetes v1.26.5 -f sample.yaml


 _   __      _          _   __
| | / /     | |        | | / /
| |/ / _   _| |__   ___| |/ /  ___ _   _
|    \| | | | '_ \ / _ \    \ / _ \ | | |
| |\  \ |_| | |_) |  __/ |\  \  __/ |_| |
\_| \_/\__,_|_.__/ \___\_| \_/\___|\__, |
                                    __/ |
                                   |___/

09:26:43 CST [GreetingsModule] Greetings
09:26:43 CST message: [k8s-worker-3]
Greetings, KubeKey!
09:26:44 CST message: [k8s-master-3]
Greetings, KubeKey!
09:26:44 CST message: [k8s-master-1]
Greetings, KubeKey!
09:26:44 CST message: [k8s-worker-1]
Greetings, KubeKey!
09:26:44 CST message: [k8s-master-2]
Greetings, KubeKey!
09:26:44 CST message: [k8s-worker-2]
Greetings, KubeKey!
09:26:44 CST success: [k8s-worker-3]
09:26:44 CST success: [k8s-master-3]
09:26:44 CST success: [k8s-master-1]
09:26:44 CST success: [k8s-worker-1]
09:26:44 CST success: [k8s-master-2]
09:26:44 CST success: [k8s-worker-2]
09:26:44 CST [NodePreCheckModule] A pre-check on nodes
09:26:45 CST success: [k8s-worker-2]
09:26:45 CST success: [k8s-worker-3]
09:26:45 CST success: [k8s-master-2]
09:26:45 CST success: [k8s-worker-1]
09:26:45 CST success: [k8s-master-3]
09:26:45 CST success: [k8s-master-1]
09:26:45 CST [ClusterPreCheckModule] Get KubeConfig file
09:26:45 CST skipped: [k8s-master-3]
09:26:45 CST skipped: [k8s-master-2]
09:26:45 CST success: [k8s-master-1]
09:26:45 CST [ClusterPreCheckModule] Get all nodes Kubernetes version
09:26:45 CST success: [k8s-worker-2]
09:26:45 CST success: [k8s-worker-3]
09:26:45 CST success: [k8s-worker-1]
09:26:45 CST success: [k8s-master-2]
09:26:45 CST success: [k8s-master-3]
09:26:45 CST success: [k8s-master-1]
09:26:45 CST [ClusterPreCheckModule] Calculate min Kubernetes version
09:26:45 CST skipped: [k8s-master-3]
09:26:45 CST success: [k8s-master-1]
09:26:45 CST skipped: [k8s-master-2]
09:26:45 CST [ClusterPreCheckModule] Check desired Kubernetes version
09:26:45 CST skipped: [k8s-master-3]
09:26:45 CST success: [k8s-master-1]
09:26:45 CST skipped: [k8s-master-2]
09:26:45 CST [ClusterPreCheckModule] Check KubeSphere version
09:26:45 CST skipped: [k8s-master-3]
09:26:45 CST skipped: [k8s-master-2]
09:26:45 CST success: [k8s-master-1]
09:26:45 CST [ClusterPreCheckModule] Check dependency matrix for KubeSphere and Kubernetes
09:26:45 CST skipped: [k8s-master-3]
09:26:45 CST skipped: [k8s-master-2]
09:26:45 CST success: [k8s-master-1]
09:26:45 CST [ClusterPreCheckModule] Get kubernetes nodes status
09:26:45 CST skipped: [k8s-master-3]
09:26:45 CST skipped: [k8s-master-2]
09:26:45 CST success: [k8s-master-1]
09:26:45 CST [UpgradeConfirmModule] Display confirmation form
+--------------+------+------+---------+----------+-------+-------+---------+-----------+--------+--------+------------+------------+-------------+------------------+--------------+
| name         | sudo | curl | openssl | ebtables | socat | ipset | ipvsadm | conntrack | chrony | docker | containerd | nfs client | ceph client | glusterfs client | time         |
+--------------+------+------+---------+----------+-------+-------+---------+-----------+--------+--------+------------+------------+-------------+------------------+--------------+
| k8s-master-1 | y    | y    | y       | y        | y     | y     | y       | y         | y      |        | v1.6.4     | y          |             |                  | CST 09:26:45 |
| k8s-master-2 | y    | y    | y       | y        | y     | y     | y       | y         | y      |        | v1.6.4     | y          |             |                  | CST 09:26:45 |
| k8s-master-3 | y    | y    | y       | y        | y     | y     | y       | y         | y      |        | v1.6.4     | y          |             |                  | CST 09:26:45 |
| k8s-worker-1 | y    | y    | y       | y        | y     | y     | y       | y         | y      |        | v1.6.4     | y          |             |                  | CST 09:26:45 |
| k8s-worker-2 | y    | y    | y       | y        | y     | y     | y       | y         | y      |        | v1.6.4     | y          |             |                  | CST 09:26:45 |
| k8s-worker-3 | y    | y    | y       | y        | y     | y     | y       | y         | y      |        | v1.6.4     | y          |             |                  | CST 09:26:45 |
+--------------+------+------+---------+----------+-------+-------+---------+-----------+--------+--------+------------+------------+-------------+------------------+--------------+

Cluster nodes status:
NAME           STATUS   ROLES                  AGE     VERSION    INTERNAL-IP    EXTERNAL-IP   OS-IMAGE                KERNEL-VERSION                CONTAINER-RUNTIME
k8s-master-1   Ready    control-plane          6d21h   v1.24.14   192.168.9.91   <none>        CentOS Linux 7 (Core)   5.4.261-1.el7.elrepo.x86_64   containerd://1.6.4
k8s-master-2   Ready    control-plane,worker   6d21h   v1.24.14   192.168.9.92   <none>        CentOS Linux 7 (Core)   5.4.261-1.el7.elrepo.x86_64   containerd://1.6.4
k8s-master-3   Ready    control-plane,worker   6d21h   v1.24.14   192.168.9.93   <none>        CentOS Linux 7 (Core)   5.4.261-1.el7.elrepo.x86_64   containerd://1.6.4
k8s-worker-1   Ready    worker                 6d21h   v1.24.14   192.168.9.95   <none>        CentOS Linux 7 (Core)   5.4.261-1.el7.elrepo.x86_64   containerd://1.6.4
k8s-worker-2   Ready    worker                 6d21h   v1.24.14   192.168.9.96   <none>        CentOS Linux 7 (Core)   5.4.261-1.el7.elrepo.x86_64   containerd://1.6.4
k8s-worker-3   Ready    worker                 6d19h   v1.24.14   192.168.9.97   <none>        CentOS Linux 7 (Core)   5.4.261-1.el7.elrepo.x86_64   containerd://1.6.4

Upgrade Confirmation:
kubernetes version: v1.24.14 to v1.26.5

Continue upgrading cluster? [yes/no]:
注意: Upgrade 信息确认,Kubernetes 提示从 v1.24.14 升级至 v1.26.5。
点击「yes」后,删减版最终执行结果如下:
09:47:18 CST [ProgressiveUpgradeModule 2/2] Set current k8s version
09:47:18 CST skipped: [LocalHost]
09:47:18 CST [ChownModule] Chown user $HOME/.kube dir
09:47:19 CST success: [k8s-worker-3]
09:47:19 CST success: [k8s-worker-1]
09:47:19 CST success: [k8s-worker-2]
09:47:19 CST success: [k8s-master-1]
09:47:19 CST success: [k8s-master-2]
09:47:19 CST success: [k8s-master-3]
09:47:19 CST Pipeline[UpgradeClusterPipeline] execute successfully
注意: 由于篇幅限制,我无法粘贴完整的执行结果。然而,我强烈建议各位读者保存并仔细分析升级过程日志,以便更深入地理解 Kubekey 升级 Kubernetes 的流程。这些日志文件提供了关于升级过程中所发生事件的重要信息,可以帮助您更好地理解整个升级过程以及可能遇到的问题,并在需要时进行故障排除。
5.2 升级过程观测说明
升级的过程中观测任务输出结果,有几点需要注意:
- Master 和 Worker 节点会逐一升级(Master 2 分钟左右,Worker 1 分钟左右),升级过程中在 Master 节点执行 kubectl 的命令时会出现 API 无法连接的情况
[root@k8s-master-1 ~]# kubectl get nodes
The connection to the server lb.opsman.top:6443 was refused - did you specify the right host or port?
说明:
出现这种现象并不是说 Kubernetes 的 API 没有高可用,实际上是伪高可用。
主要是因为 KubeKey 部署的内置负载均衡 HAProxy 只作用于 Worker 节点,在 Master 节点只会连接本机的 kube-apiserver(因此,也说明有条件还是自建负载均衡比较好)。
# Master 节点
[root@k8s-master-1 ~]# ss -ntlup | grep 6443
tcp    LISTEN     0      32768  [::]:6443               [::]:*                   users:(("kube-apiserver",pid=11789,fd=7))


# Worker 节点
[root@k8s-worker-1 ~]# ss -ntlup | grep 6443
tcp    LISTEN     0      4000   127.0.0.1:6443                  *:*                   users:(("haproxy",pid=53535,fd=7))
- 测试的 Nginx 业务服务未中断(ping、curl、df 都未见异常)
- Kubernetes 核心组件升级顺序:先升级到 v1.25.10,再升级到 v1.26.5(符合 Kubekey 设计 和 Kubernetes 次要版本升级差异的要求)
- kube-apiserver、kube-controller-manager、kube-proxy、kube-scheduler 镜像从 v1.24.14 先升级到 v1.25.10,然后再升级到 v1.26.5。
升级到 v1.25.10 时下载的二进制软件列表**(标粗的说明有变化)**:
-
kubeadm v1.25.10
-
kubelet v1.25.10
-
kubectl v1.25.10
-
helm v3.9.0
-
kubecni v1.2.0
-
crictl v1.24.0
-
etcd v3.4.13
-
containerd 1.6.4
-
runc v1.1.1
-
calicoctl v3.26.1
升级到 v1.26.5 时下载的二进制软件列表**(标粗的说明有变化)**:
-
kubeadm v1.26.5
-
kubelet v1.26.5
-
kubectl v1.26.5
-
其他的没变化
升级过程中涉及的 Image 列表**(标粗的说明有变化)**:
- calico/cni:v3.26.1
- calico/kube-controllers:v3.26.1
- calico/node:v3.26.1
- calico/pod2daemon-flexvol:v3.26.1
- coredns/coredns:1.9.3
- kubesphere/k8s-dns-node-cache:1.15.12
- kubesphere/kube-apiserver:v1.25.10
- kubesphere/kube-apiserver:v1.26.5
- kubesphere/kube-controller-manager:v1.25.10
- kubesphere/kube-controller-manager:v1.26.5
- kubesphere/kube-proxy:v1.25.10
- kubesphere/kube-proxy:v1.26.5
- kubesphere/kube-scheduler:v1.25.10
- kubesphere/kube-scheduler:v1.26.5
- kubesphere/pause:3.8
- library/haproxy:2.3
升级后所有节点核心 Image 列表(验证升级版本的顺序):
# Master 命令有筛选,去掉了 v1.24.12 和重复的 docker.io 开通的镜像
[root@k8s-master-1 ~]# crictl images | grep v1.2[4-6] | grep -v "24.12"| grep -v docker.io | sort
registry.cn-beijing.aliyuncs.com/kubesphereio/kube-apiserver            v1.24.14            b651b48a617a5       34.3MB
registry.cn-beijing.aliyuncs.com/kubesphereio/kube-apiserver            v1.25.10            4aafc4b1604b9       34.4MB
registry.cn-beijing.aliyuncs.com/kubesphereio/kube-apiserver            v1.26.5             25c2ecde661fc       35.5MB
registry.cn-beijing.aliyuncs.com/kubesphereio/kube-controller-manager   v1.24.14            d40212fa9cf04       31.5MB
registry.cn-beijing.aliyuncs.com/kubesphereio/kube-controller-manager   v1.25.10            e446ea5ea9b1b       31.5MB
registry.cn-beijing.aliyuncs.com/kubesphereio/kube-controller-manager   v1.26.5             a7403c147a516       32.4MB
registry.cn-beijing.aliyuncs.com/kubesphereio/kube-proxy                v1.24.14            e57c0d007d1ef       39.7MB
registry.cn-beijing.aliyuncs.com/kubesphereio/kube-proxy                v1.25.10            0cb798db55ff2       20.3MB
registry.cn-beijing.aliyuncs.com/kubesphereio/kube-proxy                v1.26.5             08440588500d7       21.5MB
registry.cn-beijing.aliyuncs.com/kubesphereio/kube-scheduler            v1.24.14            19bf7b80c50e5       15.8MB
registry.cn-beijing.aliyuncs.com/kubesphereio/kube-scheduler            v1.25.10            de3c37c13188f       16MB
registry.cn-beijing.aliyuncs.com/kubesphereio/kube-scheduler            v1.26.5             200132c1d91ab       17.7MB

# Worker
[root@k8s-worker-1 ~]# crictl images | grep v1.2[4-6] | grep -v "24.12"| grep -v docker.io | sort
registry.cn-beijing.aliyuncs.com/kubesphereio/kube-proxy                      v1.24.14                       e57c0d007d1ef       39.7MB
registry.cn-beijing.aliyuncs.com/kubesphereio/kube-proxy                      v1.25.10                       0cb798db55ff2       20.3MB
registry.cn-beijing.aliyuncs.com/kubesphereio/kube-proxy                      v1.26.5                        08440588500d7       21.5MB
5.3 Kubernetes 升级后验证
- 查看 Nodes 版本(VERSION 更新为 v1.26.5)
[root@k8s-master-1 ~]# kubectl get nodes -o wide
NAME           STATUS   ROLES                  AGE     VERSION   INTERNAL-IP    EXTERNAL-IP   OS-IMAGE                KERNEL-VERSION                CONTAINER-RUNTIME
k8s-master-1   Ready    control-plane          6d22h   v1.26.5   192.168.9.91   <none>        CentOS Linux 7 (Core)   5.4.261-1.el7.elrepo.x86_64   containerd://1.6.4
k8s-master-2   Ready    control-plane,worker   6d22h   v1.26.5   192.168.9.92   <none>        CentOS Linux 7 (Core)   5.4.261-1.el7.elrepo.x86_64   containerd://1.6.4
k8s-master-3   Ready    control-plane,worker   6d22h   v1.26.5   192.168.9.93   <none>        CentOS Linux 7 (Core)   5.4.261-1.el7.elrepo.x86_64   containerd://1.6.4
k8s-worker-1   Ready    worker                 6d22h   v1.26.5   192.168.9.95   <none>        CentOS Linux 7 (Core)   5.4.261-1.el7.elrepo.x86_64   containerd://1.6.4
k8s-worker-2   Ready    worker                 6d22h   v1.26.5   192.168.9.96   <none>        CentOS Linux 7 (Core)   5.4.261-1.el7.elrepo.x86_64   containerd://1.6.4
k8s-worker-3   Ready    worker                 6d20h   v1.26.5   192.168.9.97   <none>        CentOS Linux 7 (Core)   5.4.261-1.el7.elrepo.x86_64   containerd://1.6.4
- 查看 Kubernetes 资源(受限于篇幅,不展示 pod 结果,但实际变化都在 Pod 上)
[root@k8s-master-1 kubekey]# kubectl get pod,deployment,sts,ds -o wide -n kube-system
NAME                                          READY   UP-TO-DATE   AVAILABLE   AGE     CONTAINERS                     IMAGES                                                                    SELECTOR
deployment.apps/calico-kube-controllers       1/1     1            1           6d22h   calico-kube-controllers        registry.cn-beijing.aliyuncs.com/kubesphereio/kube-controllers:v3.26.1    k8s-app=calico-kube-controllers
deployment.apps/coredns                       2/2     2            2           6d22h   coredns                        registry.cn-beijing.aliyuncs.com/kubesphereio/coredns:1.8.6               k8s-app=kube-dns
deployment.apps/metrics-server                1/1     1            1           6d22h   metrics-server                 registry.cn-beijing.aliyuncs.com/kubesphereio/metrics-server:v0.4.2       k8s-app=metrics-server
deployment.apps/openebs-localpv-provisioner   1/1     1            1           6d22h   openebs-provisioner-hostpath   registry.cn-beijing.aliyuncs.com/kubesphereio/provisioner-localpv:3.3.0   name=openebs-localpv-provisioner,openebs.io/component-name=openebs-localpv-provisioner

NAME                                   READY   AGE     CONTAINERS            IMAGES
statefulset.apps/snapshot-controller   1/1     6d22h   snapshot-controller   registry.cn-beijing.aliyuncs.com/kubesphereio/snapshot-controller:v4.0.0

NAME                          DESIRED   CURRENT   READY   UP-TO-DATE   AVAILABLE   NODE SELECTOR            AGE     CONTAINERS    IMAGES                                                             SELECTOR
daemonset.apps/calico-node    6         6         6       6            6           kubernetes.io/os=linux   6d22h   calico-node   registry.cn-beijing.aliyuncs.com/kubesphereio/node:v3.26.1         k8s-app=calico-node
daemonset.apps/kube-proxy     6         6         6       6            6           kubernetes.io/os=linux   6d22h   kube-proxy    registry.cn-beijing.aliyuncs.com/kubesphereio/kube-proxy:v1.26.5   k8s-app=kube-proxy
daemonset.apps/nodelocaldns   6         6         6       6            6           <none>                   6d22h   node-cache    kubesphere/k8s-dns-node-cache:1.15.12                              k8s-app=nodelocaldns
- 查看二进制文件(对比升级前结果,验证组件是否有变更)
[root@k8s-master-1 ~]# ll /usr/local/bin/
total 360880
-rwxr-xr-x 1 root root  65770992 Dec  6 09:41 calicoctl
-rwxr-xr-x 1 root root  23847904 Nov 29 13:50 etcd
-rwxr-xr-x 1 kube root  17620576 Nov 29 13:50 etcdctl
-rwxr-xr-x 1 root root  46182400 Dec  6 09:41 helm
-rwxr-xr-x 1 root root  46788608 Dec  6 09:41 kubeadm
-rwxr-xr-x 1 root root  48046080 Dec  6 09:41 kubectl
-rwxr-xr-x 1 root root 121277432 Dec  6 09:41 kubelet
drwxr-xr-x 2 kube root        71 Nov 29 13:51 kube-scripts
注意: 除了 etcd、etcdctl 其他都有更新,说明 ETCD 不在组件更新范围内
kubectl create deployment nginx-upgrade-test --image=nginx:latest --replicas=6 -n upgrade-test
说明: 本测试比较简单,生产环境建议更充分的测试。
# 查看 Deployment
[root@k8s-master-1 ~]# kubectl get deployment -n upgrade-test -o wide
NAME                 READY   UP-TO-DATE   AVAILABLE   AGE   CONTAINERS   IMAGES         SELECTOR
nginx-upgrade-test   6/6     6            6           13s   nginx        nginx:latest   app=nginx-upgrade-test

# 查看 Pod
[root@k8s-master-1 ~]# kubectl get deployment,pod -n upgrade-test -o wide
NAME                                 READY   UP-TO-DATE   AVAILABLE   AGE   CONTAINERS   IMAGES         SELECTOR
deployment.apps/nginx-upgrade-test   6/6     6            6           56s   nginx        nginx:latest   app=nginx-upgrade-test

NAME                                      READY   STATUS    RESTARTS   AGE   IP              NODE           NOMINATED NODE   READINESS GATES
pod/nginx-upgrade-test-7b668447c4-cglmh   1/1     Running   0          56s   10.233.80.85    k8s-master-1   <none>           <none>
pod/nginx-upgrade-test-7b668447c4-cmzqx   1/1     Running   0          56s   10.233.88.181   k8s-worker-1   <none>           <none>
pod/nginx-upgrade-test-7b668447c4-ggnjg   1/1     Running   0          56s   10.233.87.106   k8s-worker-3   <none>           <none>
pod/nginx-upgrade-test-7b668447c4-hh8h4   1/1     Running   0          56s   10.233.96.38    k8s-master-3   <none>           <none>
pod/nginx-upgrade-test-7b668447c4-hs7n7   1/1     Running   0          56s   10.233.74.130   k8s-worker-2   <none>           <none>
pod/nginx-upgrade-test-7b668447c4-s6wps   1/1     Running   0          56s   10.233.85.102   k8s-master-2   <none>           <none>
pod/test-nginx-0                          1/1     Running   0          85m   10.233.80.77    k8s-master-1   <none>           <none>
pod/test-nginx-1                          1/1     Running   0          85m   10.233.96.33    k8s-master-3   <none>           <none>
pod/test-nginx-2                          1/1     Running   0          84m   10.233.85.99    k8s-master-2   <none>           <none>
pod/test-nginx-3                          1/1     Running   0          84m   10.233.87.104   k8s-worker-3   <none>           <none>
pod/test-nginx-4                          1/1     Running   0          83m   10.233.88.180   k8s-worker-1   <none>           <none>
pod/test-nginx-5                          1/1     Running   0          83m   10.233.74.129   k8s-worker-2   <none>           <none>
- 重建已有 Pod(未验证,生产环境升级必须验证,防止出现跨版本的兼容性问题)
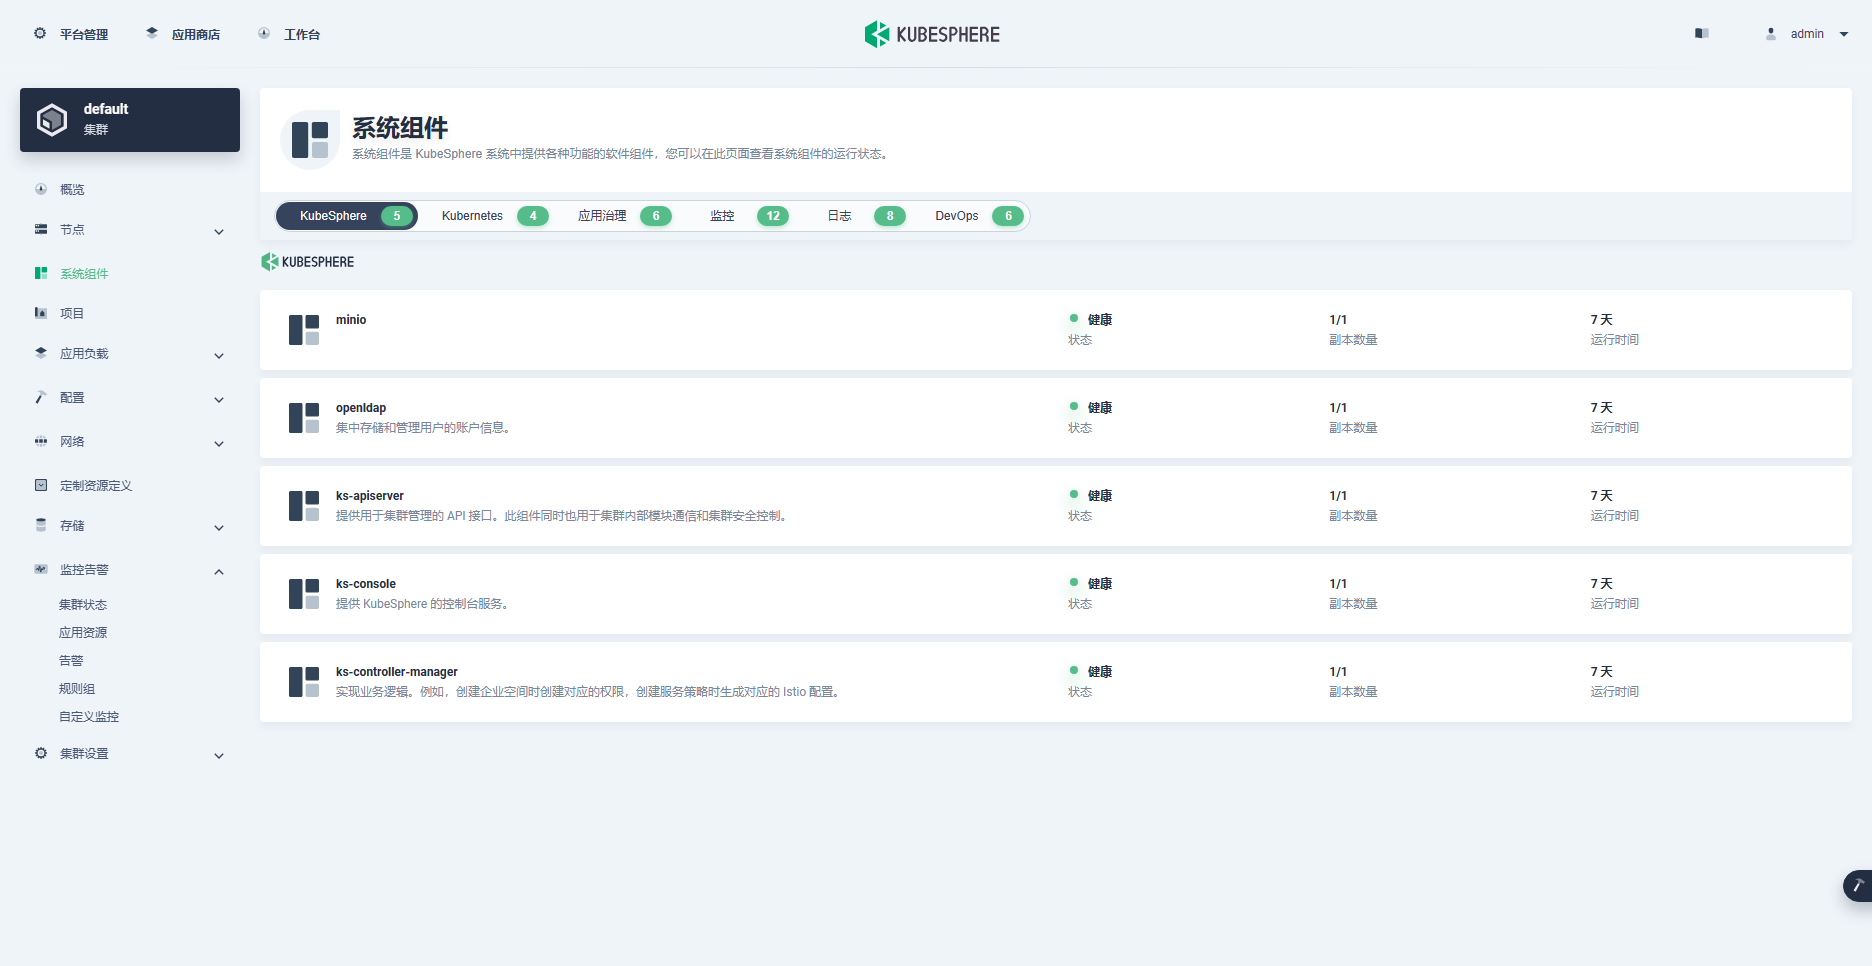
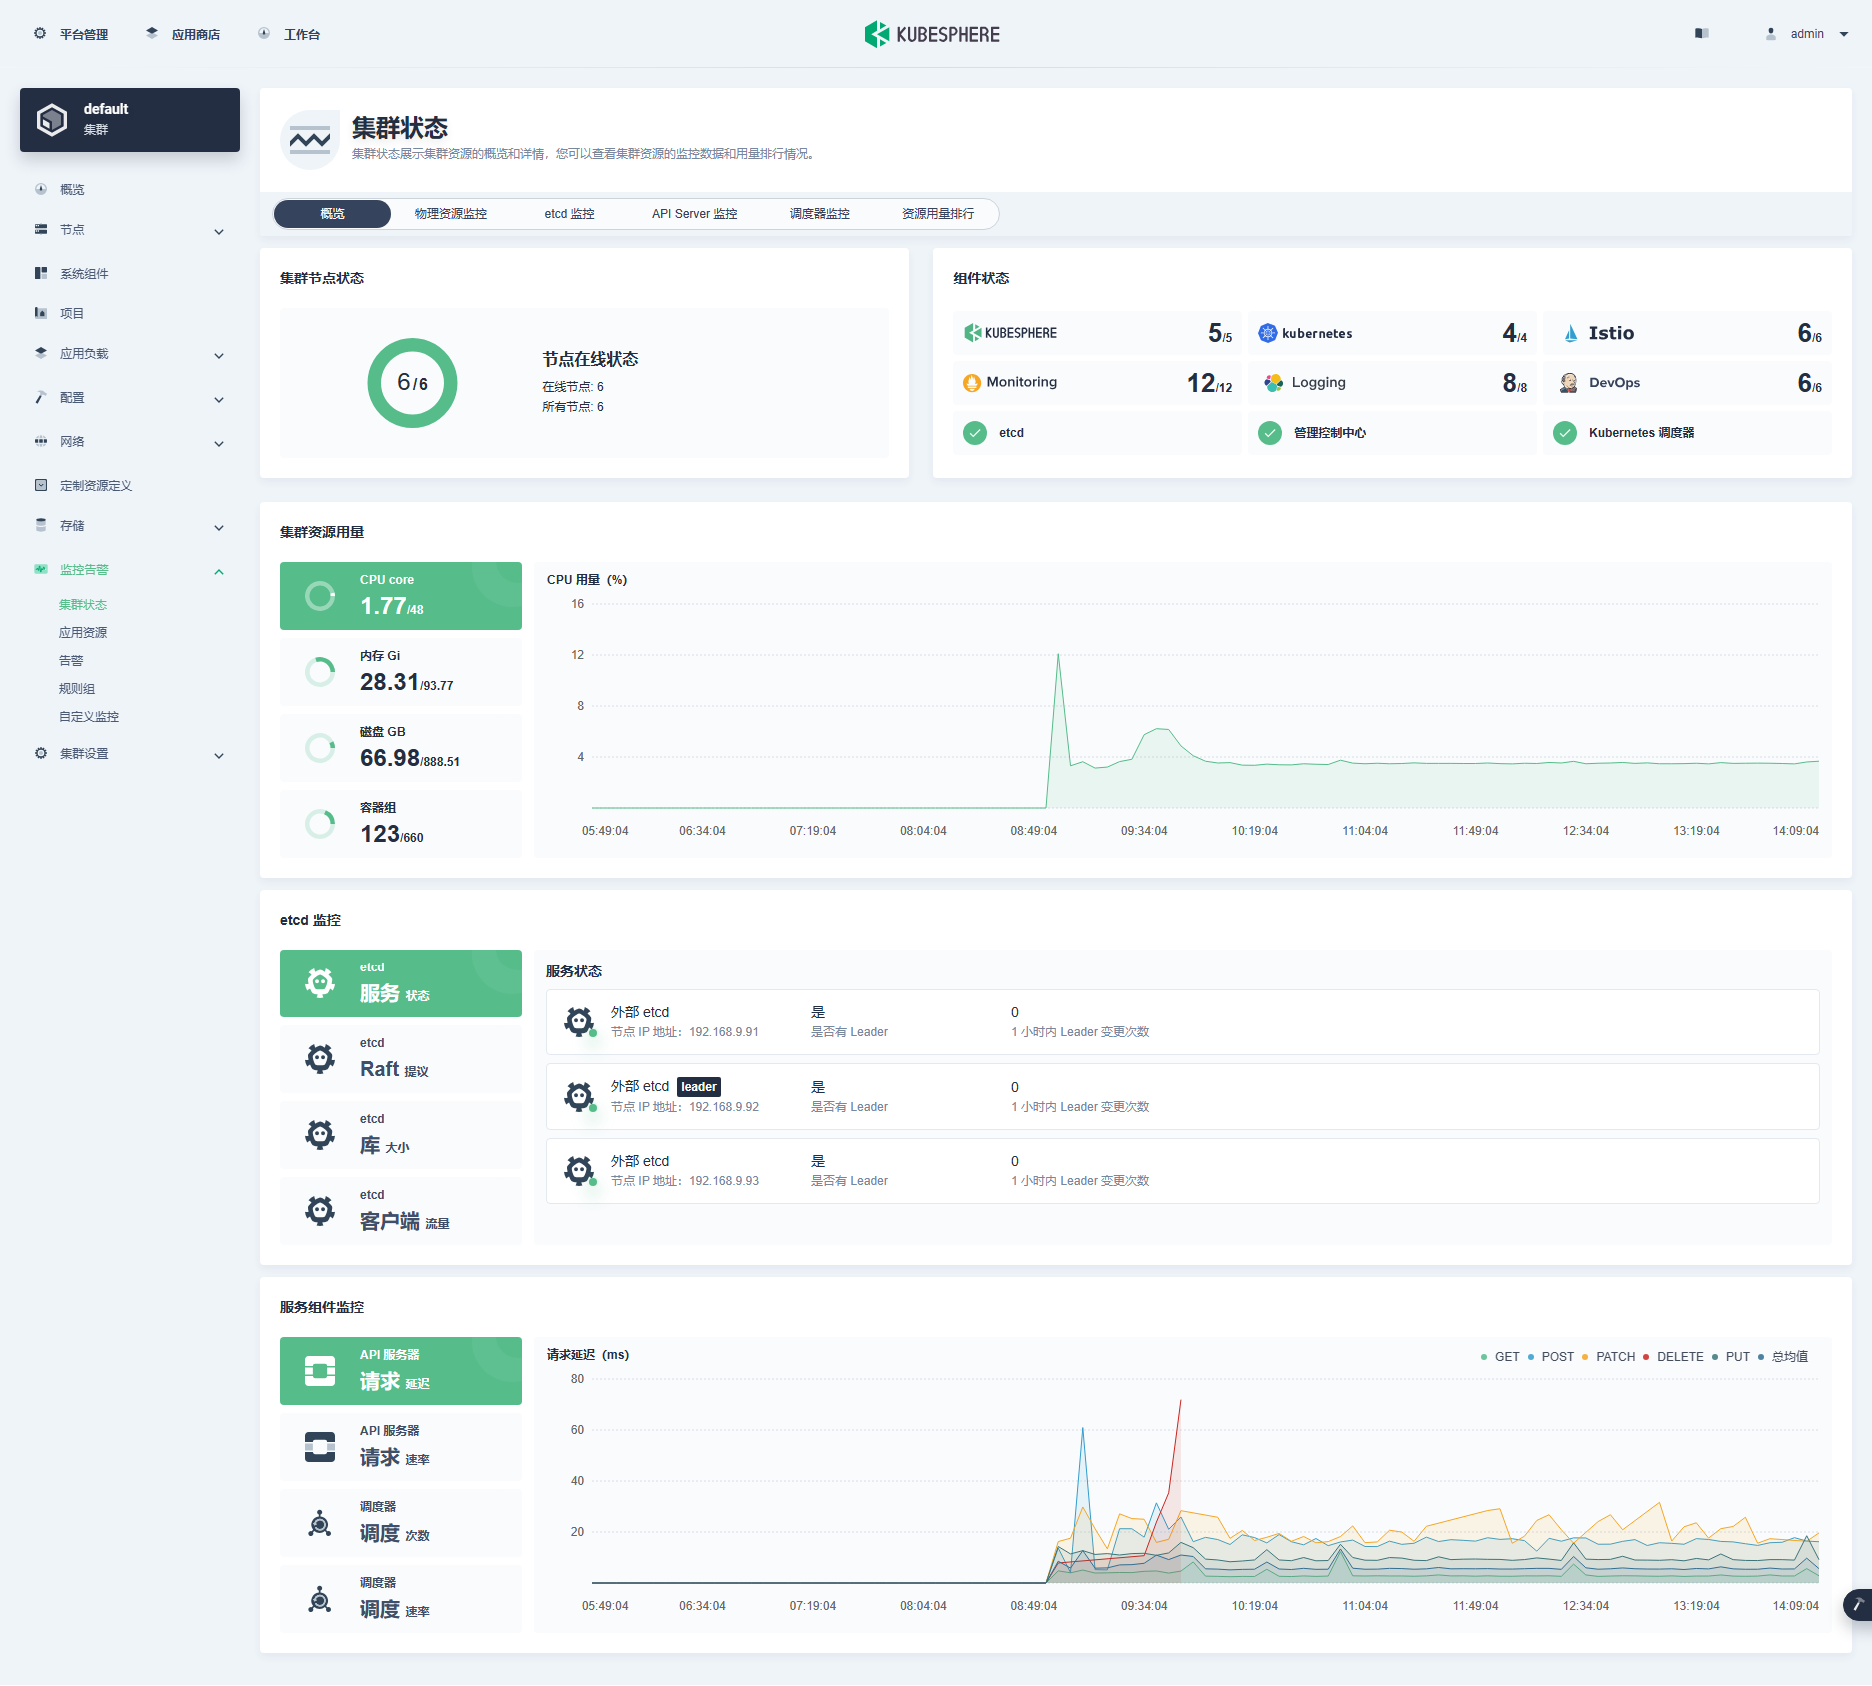
- 在 KubeSphere 管理控制台查看集群状态
![ksp-v124-to-v126-clusters-components]()
![ksp-v124-to-v126-clusters-monitor-cluster-overview]()
经过一系列的操作,我们成功地利用 KubeKey 完成了 Kubernetes 次要版本的升级和测试验证。在这个过程中,我们经历了多个关键环节,包括实战环境准备、升级实施以及测试验证等。最终,我们实现了版本升级的目标,并且验证了升级后的系统(基本)能够正常运行。
6. 常见问题
问题 1
[root@k8s-master-1 kubekey]# ./kk upgrade --with-kubesphere v3.4.1 -f sample.yaml
14:00:54 CST [FATA] The number of master/control-plane cannot be 0
修改集群部署文件 sample.yaml,正确填写 roleGroups.master:master 节点信息
问题 2
Continue upgrading cluster? [yes/no]: yes
14:07:02 CST success: [LocalHost]
14:07:02 CST [SetUpgradePlanModule 1/2] Set upgrade plan
14:07:02 CST success: [LocalHost]
14:07:02 CST [SetUpgradePlanModule 1/2] Generate kubeadm config
14:07:02 CST message: [k8s-master-1]
Failed to get container runtime cgroup driver.: Failed to exec command: sudo -E /bin/bash -c "docker info | grep 'Cgroup Driver'"
/bin/bash: docker: command not found: Process exited with status 1
14:07:02 CST retry: [k8s-master-1]
14:07:07 CST message: [k8s-master-1]
Failed to get container runtime cgroup driver.: Failed to exec command: sudo -E /bin/bash -c "docker info | grep 'Cgroup Driver'"
/bin/bash: docker: command not found: Process exited with status 1
14:07:07 CST retry: [k8s-master-1]
14:07:12 CST message: [k8s-master-1]
Failed to get container runtime cgroup driver.: Failed to exec command: sudo -E /bin/bash -c "docker info | grep 'Cgroup Driver'"
/bin/bash: docker: command not found: Process exited with status 1
14:07:12 CST skipped: [k8s-master-3]
14:07:12 CST skipped: [k8s-master-2]
14:07:12 CST failed: [k8s-master-1]
error: Pipeline[UpgradeClusterPipeline] execute failed: Module[SetUpgradePlanModule 1/2] exec failed:
failed: [k8s-master-1] [GenerateKubeadmConfig] exec failed after 3 retries: Failed to get container runtime cgroup driver.: Failed to exec command: sudo -E /bin/bash -c "docker info | grep 'Cgroup Driver'"
/bin/bash: docker: command not found: Process exited with status 1
修改集群部署文件 sample.yaml,正确填写 kubernetes.containerManager: containerd,默认使用 Docker。
7. 总结
本文通过实战演示了 KubeKey 部署的 KubeSphere 和 Kubernetes 集群升级 Kubernetes 次要版本的详细过程,以及升级过程中遇到的问题和对应的解决方案。同时,也阐述了在升级前和升级后需要进行哪些验证,以确保系统升级的成功。
利用 KubeKey 升级 KubeSphere 和 Kubernetes 并完成测试验证是一个复杂而重要的任务。通过这次升级实战,我们验证了技术可行性、实现了系统的更新和优化,提高了系统的性能和安全性。同时,我们也积累了宝贵的经验教训,为未来的生产环境升级工作提供了参考和借鉴。
概括总结全文主要涉及以下内容:
- 升级实战环境准备
- Kubernetes 升级准备和升级过程监测
- 利用 KubeKey 升级 Kubernetes
- Kubernetes 升级后验证
本文所提供的实战内容可以直接应用于测试和研发环境。同时,对于生产环境也有一定的参考价值。然而,请务必谨慎对待,不要直接将其应用于生产环境。
本文由博客一文多发平台 OpenWrite 发布!