写在前面
这里只介绍liteflow的简单基础使用以及作者对liteflow进行可视化扩展的相关阐述
一、背景及意义
背景:对于拥有复杂业务逻辑的系统承载着核心业务逻辑,这些核心业务逻辑涉及内部逻辑运算,缓存操作,持久化操作,外部资源调取,内部其他系统RPC调用等等。项目几经易手,维护的成本就会越来越高。各种硬代码判断,分支条件越来越多。代码的抽象,复用率也越来越低,各个模块之间的耦合度很高。一小段逻辑的变动,会影响到其他模块,需要进行完整回归测试来验证。如要灵活改变业务流程的顺序,则要进行代码大改动进行抽象,重新写方法。实时热变更业务流程,几乎很难实现
意义:逻辑解耦、提高扩展性、降低维护成本、能力充分复用、流程灵活编排
二、常用流程编排框架
三、liteflow基础使用
1.添加依赖jar包
<dependency>
	<groupId>com.yomahub</groupId>
    <artifactId>liteflow-spring</artifactId>
	<version>2.10.4</version>
</dependency>
2.定义组件
定义组件和实现某些组件,注册进上下文
@Component("a")
public class ACmp extends NodeComponent {

    @Override
    public void process() {
        //do your business
    }
}
3.配置
添加对应的配置类及配置文件
Spring xml中的配置
<context:component-scan base-package="com.yomahub.flowtest.components" />

<bean id="springAware" class="com.yomahub.liteflow.spi.spring.SpringAware"/>

<bean class="com.yomahub.liteflow.spring.ComponentScanner"/>

<bean id="liteflowConfig" class="com.yomahub.liteflow.property.LiteflowConfig">
    <property name="ruleSource" value="config/flow.el.xml"/>
</bean>

<bean id="flowExecutor" class="com.yomahub.liteflow.core.FlowExecutor">
    <property name="liteflowConfig" ref="liteflowConfig"/>
</bean>

<!-- 如果上述enableLog为false,下面这段也可以省略 -->
<bean class="com.yomahub.liteflow.monitor.MonitorBus">
    <property name="liteflowConfig" ref="liteflowConfig"/>
</bean>
4.规则文件的定义
--流程的定义(第3步中liteflowConfig指定了规则文件为config/flow.xml),所以需要在resources下新建文件夹config,在新建flow.xml文件,配置要定义的流程
<?xml version="1.0" encoding="UTF-8"?>
<flow>
    <chain name="chain1">
        THEN(a, b, c)
    </chain>
</flow>
5.执行
编排好的流程,在需要执行的地方注入FlowExecutor,执行execute2Resp
@Component
public class YourClass{

    @Resource
    private FlowExecutor flowExecutor;

    @Test
    public void testConfig(){
        LiteflowResponse response = flowExecutor.execute2Resp("chain1", "arg");
    }
}
四、liteflow在实际中的应用
这里弱化背后的实际业务只展示作者在实际中的应用案例
1.添加依赖jar包
    <properties>
        <liteflow-spring.version>2.8.0</liteflow-spring.version>
    </properties>
    <dependencyManagement>
        <dependencies>
            <dependency>
                <groupId>com.yomahub</groupId>
                <artifactId>liteflow-spring</artifactId>
                <version>${liteflow-spring.version}</version>
            </dependency>
        </dependencies>
    </dependencyManagement>
2.定义组件
定义组件和实现某些组件,注册进上下文
@LiteflowComponent("checkRealNameAuthCmp")
@LiteflowCmpDefine
public class CheckRealNameAuthCmp {
    private static final Logger log = LoggerFactory.getLogger(CheckRealNameAuthCmp.class);
    @LiteflowMethod(LiteFlowMethodEnum.PROCESS)
    public void process(NodeComponent nodeComponent) throws Exception {
       // 获取请求参数
       GeneratePolicyRightsParam generatePolicyRightsParam = nodeComponent.getSlot().getRequestData();
        // 如果pin为空则结束流程
       if (generatePolicyRightsParam == null || StringUtil.isEmpty(generatePolicyRightsParam.getUserPin())) {
                log.info("CheckRealNameAuthCmp -> process end, nodeComponent={},pin is null.", JsonUtil.toJSONString(nodeComponent));
                nodeComponent.setIsEnd(true);
            }
      //封装设置流程编排上下文信息
      GenerateRightsContext generateRightsContext = nodeComponent.getContextBean(GenerateRightsContext.class);
            generateRightsContext.setGeneratePolicyRightsParam(generatePolicyRightsParam);
    }
}
LiteflowComponent:https://liteflow.yomahub.com/pages/v2.8.X/8486fb/
LiteflowCmpDefine:https://liteflow.yomahub.com/pages/v2.8.X/f33919/
3.配置
添加对应的配置类及配置文件
Spring xml中的配置
spring-config.xml
<import resource="classpath*:spring/spring-config-liteflow.xml"/>
spring-config-liteflow.xml
    <bean id="springAware" class="com.yomahub.liteflow.spi.spring.SpringAware"/>
    <bean id="springComponentScaner" class="com.yomahub.liteflow.spring.ComponentScanner"/>

    <!-- 注入liteflow的配置文件 -->
    <bean id="liteflowConfig" class="com.yomahub.liteflow.property.LiteflowConfig">
        <property name="ruleSource" value="liteflow/flow.xml"/>
    </bean>

    <!-- 注入liteflow的执行引擎 -->
    <bean id="flowExecutor" class="com.yomahub.liteflow.core.FlowExecutor">
        <property name="liteflowConfig" ref="liteflowConfig"/>
    </bean>

    <!-- 注入liteflow的MonitorBus-->
    <bean class="com.yomahub.liteflow.monitor.MonitorBus">
        <constructor-arg ref="liteflowConfig"/>
        <property name="liteflowConfig" ref="liteflowConfig"/>
    </bean>
4.规则文件的定义
--流程的定义(第3步中liteflowConfig指定了规则文件为liteflow/flow.xml),所以需要在resources下新建文件夹liteflow,在新建flow.xml文件,配置要定义的流程
flow.xml
<?xml version="1.0" encoding="UTF-8"?>
<flow>
    <!-- liteflow流程编排:生成(发放)保单权益-->
    <chain name="sendPolicyRightsChain">
        <when value="checkRealNameAuthCmp"/>
        <then value="checkNewPolicyRightsCmp"/>
        <then value="getPolicyInfoCmp"/>
        <then value="policyMatchServiceRuleCmp"/>
        <then value="initPolicyRightsDataCmp"/>
        <then value="creatPlanGantRightsDataCmp"/>
        <then value="asyncFullFillCmp"/>
    </chain>
</flow>
5.执行
执行编排好的流程,在需要执行的地方注入FlowExecutor,执行execute2Resp
 @Resource
 private FlowExecutor flowExecutor;

public Boolean sendPolicyRights(GeneratePolicyRightsParam generatePolicyRightsParam) {
      //todo 入参和上下文不能混用,通用信息用map
      LiteflowResponse response = flowExecutor.execute2Resp("sendPolicyRightsChain", generatePolicyRightsParam, GenerateRightsContext.class,GenerateRightsContext.class);

}
五、liteflow能力扩展(可视化)
liteflowt提供了流程编排的能力,只有研发人员能够了解这内在的流程编排含义,对于其他产品或者业务并不能直观的了解当前的业务流程,可视化并不友好。这时我们如何让当前的流程可视化呢?编写一个页面直接读取配置文件flow.xml进行显示,这是没有意义的。有意义的是我们能够对组件进行可视化、对流程可视化、对流程编排可视化。
1、思想
提供新的jar包,获取到业务系统声名的组件、流程、显示流程和组件、提供编排能力。
说明:
1、小工具jar包为可视化流程编排小工具,主要提供获取业务系统声明的组件、保存的流程、进行流程可视化展示、进行流程编排可视化等,使用liteflow-util标识区别于业务系统。
2、业务系统为组件声明、流程执行、业务逻辑系统,使用liteflow-test标识
2、实现
2.1获取特定的类或方法
如何从liteflow-util中获取liteflow-test中声明的组件
2.1.1获取上下文环境
ApplicationContextAware
当一个bean的属性初始化后会回调到setApplicationContext,从而设置应用上下文。
public interface ApplicationContextAware extends Aware {
	/**
	 * Set the ApplicationContext that this object runs in.
	 * Normally this call will be used to initialize the object.
	 *

Invoked after population of normal bean properties but before an init callback such
	 * as {@link org.springframework.beans.factory.InitializingBean#afterPropertiesSet()}
	 * or a custom init-method. Invoked after {@link ResourceLoaderAware#setResourceLoader},
	 * {@link ApplicationEventPublisherAware#setApplicationEventPublisher} and
	 * {@link MessageSourceAware}, if applicable.
	 * @param applicationContext the ApplicationContext object to be used by this object
	 * @throws ApplicationContextException in case of context initialization errors
	 * @throws BeansException if thrown by application context methods
	 * @see org.springframework.beans.factory.BeanInitializationException
	 */
	void setApplicationContext(ApplicationContext applicationContext) throws BeansException;
}
在liteflow-util中使用一个类来实现ApplicationContextAware,从而获取到liteflow-test(依赖当前jar包的应用)的上下文环境
@Configuration
public class LiteFlowApplicationContext implements ApplicationContextAware {
   private static ApplicationContext controllerApplicationContext;
   @Override
   public void setApplicationContext(ApplicationContext applicationContext) throws BeansException {
      System.out.println("applicationContext = " + applicationContext);
      LiteFlowApplicationContext.controllerApplicationContext=applicationContext;
   }
   public static ApplicationContext getControllerApplicationContext() {
      return controllerApplicationContext;
   }
}
2.1.2从上下文获取类
在liteflow-util中根据上下文环境获取组件类这里的重点是Map<String, Object> mvcObjects = context.getBeansWithAnnotation(Service.class);
@Slf4j
public class ReferenceManager {
    private static Map<Class<?>, Object> interfaceMapRef = new ConcurrentHashMap<Class<?>, Object>();
    private static ReferenceManager instance;
    private ReferenceManager() {
    }
    public synchronized static ReferenceManager getInstance() {
        if (null != instance) {
            return instance;
        }
        instance = new ReferenceManager();
        ApplicationContext controllerContext = LiteFlowApplicationContext.getControllerApplicationContext();
        interfaceMapInit(controllerContext);
        return instance;
    }
    private static void interfaceMapInit(ApplicationContext context) {
        try {
            Map<String, Object> objects = Maps.newHashMapWithExpectedSize(64);
            //优化 允许 ServiceBean 被MVC容器扫描
            Map<String, Object> mvcObjects = context.getBeansWithAnnotation(Service.class);
            objects.putAll(mvcObjects);
            if (objects == null || objects.size() == 0) {
                return;
            }
            for (Entry<String, Object> entry : objects.entrySet()) {
                /**
                 * 获取代理对象的原对象
                 * 因为 jdk 动态代理通过接口
                 */
                Object objectImplProxy = entry.getValue();
                Object objectImpl = AopTargetUtils.getTarget(objectImplProxy);
                Class objectImplClass = objectImpl.getClass();
                if (objectImplClass.getInterfaces().length > 0) {
                    /**
                     * 规定 每个interface 只对应 一个实现类
                     * 如果 多个类实现了该接口 接口列表中只 显示第一个实现类
                     */
                    Class interfaceClass = objectImplClass.getInterfaces()[0];
                    Object object = interfaceMapRef.get(interfaceClass);
                    if (object == null) {
                        interfaceMapRef.put(interfaceClass, objectImpl);
                    } else {
                    }
                } else {
                }
            }
        } catch (Exception e) {
        }
    }
    public Map<Class<?>, Object> getInterfaceMapRef() {
        return interfaceMapRef;
    }
}
@Component
public class ServiceScanner {
    public Set<Class<?>> classes() {
        return interfaceMapRef().keySet();
    }
    public Map<Class<?>, Object> interfaceMapRef() {
        return ReferenceManager.getInstance().getInterfaceMapRef();
    }
}
public class AopTargetUtils {
	/**
	 * 获取 目标对象
	 * @param proxy 代理对象
	 * @return
	 * @throws Exception
	 */
	public static Object getTarget(Object proxy) throws Exception {

		if(!AopUtils.isAopProxy(proxy)) {
			return proxy;//不是代理对象
		}
		if(AopUtils.isJdkDynamicProxy(proxy)) {
			return getJdkDynamicProxyTargetObject(proxy);
		} else { //cglib
			return getCglibProxyTargetObject(proxy);
		}
	}
	private static Object getCglibProxyTargetObject(Object proxy) {
		try{
			Field h = proxy.getClass().getDeclaredField("CGLIB$CALLBACK_0");
			h.setAccessible(true);
			Object dynamicAdvisedInterceptor = h.get(proxy);
			Field advised = dynamicAdvisedInterceptor.getClass().getDeclaredField("advised");
			advised.setAccessible(true);
			Object target = ((AdvisedSupport) advised.get(dynamicAdvisedInterceptor)).getTargetSource().getTarget();
			return target;
		} catch(Exception e){
			e.printStackTrace();
			return null;
		}
	}
	private static Object getJdkDynamicProxyTargetObject(Object proxy) {
		try{
			Field h = proxy.getClass().getSuperclass().getDeclaredField("h");
			h.setAccessible(true);
			AopProxy aopProxy = (AopProxy) h.get(proxy);
			Field advised = aopProxy.getClass().getDeclaredField("advised");
			advised.setAccessible(true);
			Object target = ((AdvisedSupport) advised.get(aopProxy)).getTargetSource().getTarget();
			return target;
		} catch(Exception e){
			e.printStackTrace();
			return null;
		}
	}
}
2.2访问liteflow-util页面
如何在liteflow-test里访问到liteflow-util包里的页面并展示
(1)在liteflow-util内编写一个Servlet类,直接继承HttpServlet ,重写doGet或者doPost方法
(2)在liteflow-util内将Servlet类配置到web.xml中
(3)在liteflow-util内准备前端的页面(form表单、按钮交互)
(4)在liteflow-test内引入依赖并启动liteflow-test
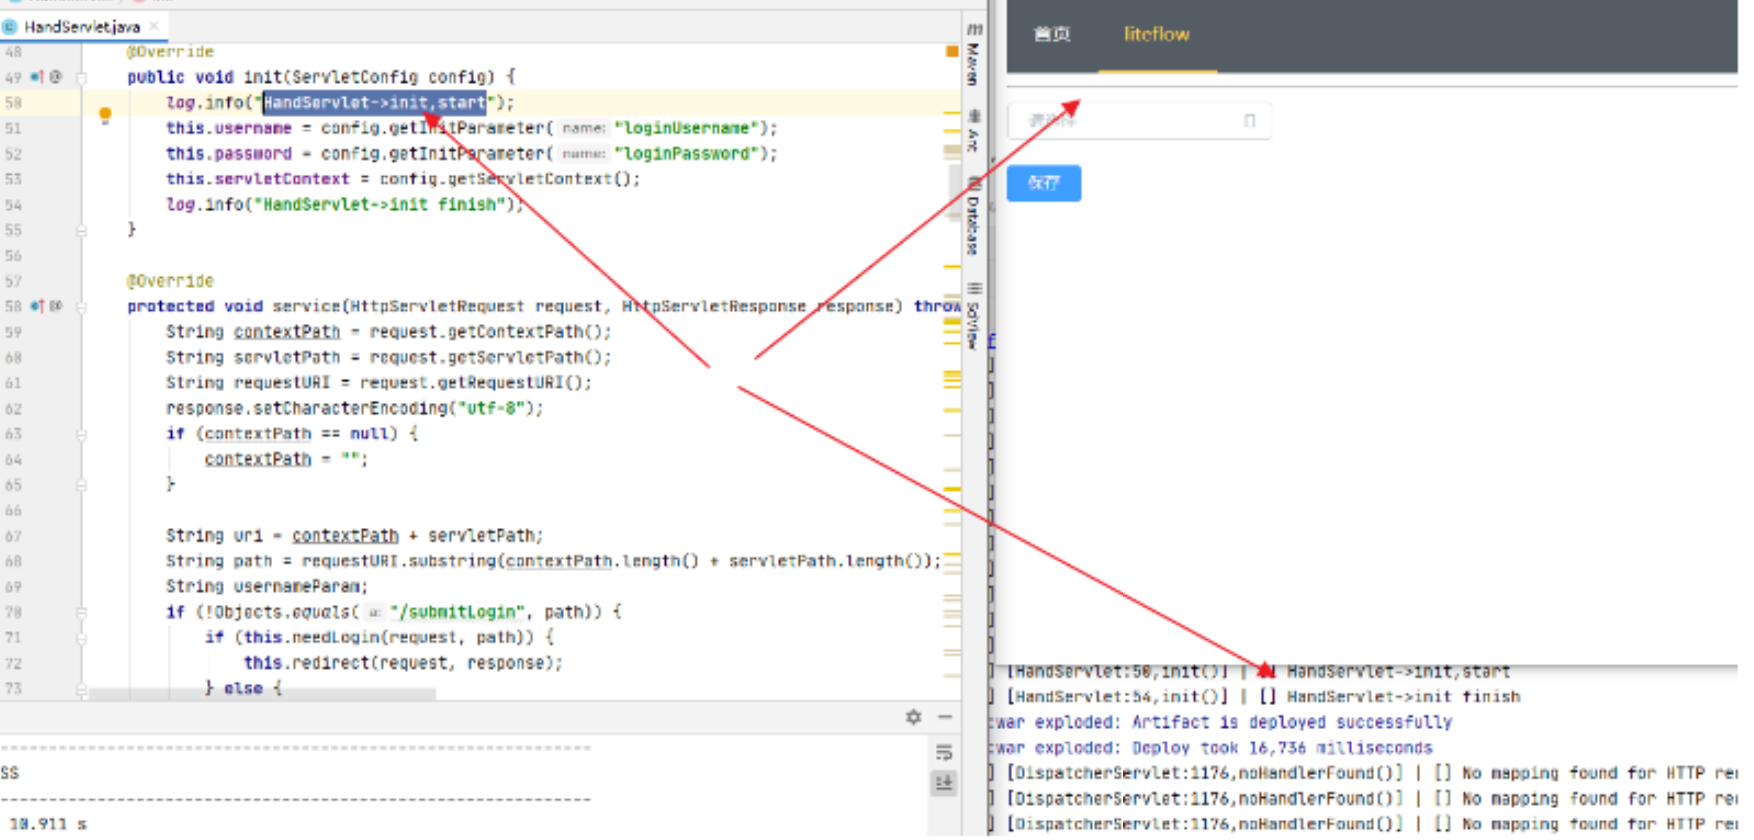
2.2.1HttpServlet
public class HandServlet extends HttpServlet {
    private static final Logger log = LoggerFactory.getLogger(HandServlet.class);
    private String username = null;
    private String password = null;
    private ServletContext servletContext;
    public HandServlet() {
    }
    @Override
    public void init(ServletConfig config) {
        log.info("HandServlet->init,start");
        this.username = config.getInitParameter("loginUsername");
        this.password = config.getInitParameter("loginPassword");
        this.servletContext = config.getServletContext();
        log.info("HandServlet->init finish");
    }
    @Override
    protected void service(HttpServletRequest request, HttpServletResponse response) throws IOException {
        String contextPath = request.getContextPath();
        String servletPath = request.getServletPath();
        String requestURI = request.getRequestURI();
        response.setCharacterEncoding("utf-8");
        if (contextPath == null) {
            contextPath = "";
        }
        String uri = contextPath + servletPath;
        String path = requestURI.substring(contextPath.length() + servletPath.length());
        String usernameParam;
        if (!Objects.equals("/submitLogin", path)) {
            if (this.needLogin(request, path)) {
                this.redirect(request, response);
            } else {
                Result result;
                try {
                    result = this.requestHandler(path, request);
                } catch (Throwable var11) {
                    log.error("HandServlet->service,requestHandler error", var11);
                    result = Result.buildFail(var11.getMessage());
                }
                if (null != result) {
                    response.getWriter().print(JSON.toJSONString(result));
                } else {
                    this.returnResourceFile(path, uri, response);
                }
            }
        } else {
            usernameParam = request.getParameter("loginUsername");
            String passwordParam = request.getParameter("loginPassword");
            System.out.println("usernameParam = " + usernameParam);
            System.out.println("passwordParam = " + passwordParam);
//            if (this.username.equals(usernameParam) && this.password.equals(passwordParam)) {
            HttpSession session = request.getSession();
            session.setAttribute("lite-flow", this.username);
            session.setMaxInactiveInterval(300);
            response.getWriter().print(JSON.toJSONString(Result.buildSuccess("success")));
//            } else {
//                response.getWriter().print(JSON.toJSONString(Result.buildFail("用户名或密码错误")));
//            }
        }
    }
    private void redirect(HttpServletRequest request, HttpServletResponse response) throws IOException {
        if (request.getHeader("X-Requested-With") != null && "XMLHttpRequest".equals(request.getHeader("X-Requested-With"))) {
            response.getWriter().print(JSON.toJSONString(Result.buildReLogin()));
        } else if (request.getHeader("Accept") != null && request.getHeader("Accept").contains("application/json")) {
            response.getWriter().print(JSON.toJSONString(Result.buildReLogin()));
        } else {
            response.sendRedirect("/lite-flow/login.html");
        }
    }
    private Result requestHandler(String path, HttpServletRequest request) {
        System.out.println("path = " + path);
        System.out.println("request = " + request);
        String initMenu = "/initMenu";
        String liteflow = "/liteflow";
        if (initMenu.equals(path)) {
            Map<String, Object> map = new HashMap(2);
            List<String> classObjectMap = getClassObjectMap();
            classObjectMap.forEach(item -> {
                int i = item.lastIndexOf(".");
                String substring = item.substring(i+1);
                System.out.println("substring = " + substring);
   LiteFlowNodeBuilder.createCommonNode().setId(substring).setName(substring).setClazz(item).build();
            });
            map.put("interfaceMapRef", classObjectMap);
            return Result.buildSuccess(map);
        } else if (liteflow.equals(path)) {
            try {
                try {
                    String postData = this.getPostData(request);
                    log.info("HandServlet -> requestHandler start, postData={}", postData);
                    JSONObject jsonObject = JSONObject.parseObject(postData);
                    JSONArray checkList = jsonObject.getJSONArray("checkList");
                    String chainId = (String) jsonObject.get("chainId");
                    log.info("HandServlet -> requestHandler start, path={},checkList={}", path, checkList);
                    ArrayList arrayList = new ArrayList();
                    checkList.forEach(item -> {
                        String itemStr = (String) item;
                        int i = itemStr.lastIndexOf(".");
                        String substring = itemStr.substring(i+1);
                        arrayList.add(substring);
                    });
                    String str = StringUtils.join(arrayList, ",");
                    log.info("HandServlet -> requestHandler start, str={}", str);
//                    String elss = "THEN(" + str + ")";
//                    log.info("HandServlet -> requestHandler start, elss={}", elss);
                    Condition condition = LiteFlowConditionBuilder.createCondition(ConditionTypeEnum.TYPE_THEN).setValue(str).build();
                    log.info("HandServlet -> requestHandler start, condition={}", condition);
                    LiteFlowChainBuilder.createChain().setChainName(chainId).setCondition(condition).build();
                } catch (Throwable var3) {
                    log.error("HandServlet -> requestHandler exception 未知异常, var3={}", var3);
                }
            } catch (Throwable var3) {
                log.info("MqUtil->haveProducer,error", var3);
            }
            return Result.buildSuccess(false);
        } else {
            return null;
        }
    }

    public String getPostData(HttpServletRequest request) {
        StringBuilder data = new StringBuilder();
        String line;
        BufferedReader reader;
        try {
            reader = request.getReader();
            while (null != (line = reader.readLine())) {
                data.append(line);
            }
        } catch (IOException e) {
            return null;
        }
        return data.toString();
    }

    private List<String> getClassObjectMap() {
        List<String> result = new ArrayList<>();
        WebApplicationContext webApplicationContext = WebApplicationContextUtils.getWebApplicationContext(servletContext);
        Map<String, ServiceScanner> serviceScannerMap = webApplicationContext.getBeansOfType(ServiceScanner.class);
        ServiceScanner serviceScanner = serviceScannerMap.get("serviceScanner");
        Map<Class<?>, Object> interfaceMapRef = serviceScanner.interfaceMapRef();
        if (null != interfaceMapRef) {
            //排序 所有接口
            List<Map.Entry<Class<?>, Object>> arrayList = new ArrayList<Map.Entry<Class<?>, Object>>(interfaceMapRef.entrySet());
            Collections.sort(arrayList, new Comparator<Map.Entry<Class<?>, Object>>() {
                @Override
                public int compare(Map.Entry<Class<?>, Object> o1, Map.Entry<Class<?>, Object> o2) {
                    return o1.getKey().getSimpleName().compareTo(o2.getKey().getSimpleName());
                }
            });
            //遍历 所有接口
            for (Map.Entry<Class<?>, Object> entry : arrayList) {
                String className = entry.getValue().getClass().getName();
                System.out.println("class = " + className);
                result.add(className);
//                List<Method> interfaceMethodList = Arrays.asList(entry.getKey().getDeclaredMethods());
//                //方法列表排序
//                Collections.sort(interfaceMethodList, new Comparator<Method>() {
//                    @Override
//                    public int compare(Method o1, Method o2) {
//                        return o1.getName().compareTo(o2.getName());
//                    }
//                });
//                for (Method method : interfaceMethodList) {
//                    System.out.println("method = " + method);
//                    System.out.println("methodName = " + method.getName());
//                    System.out.println("methodParameterTypes = " + method.getParameterTypes());
//                    System.out.println("methodReturn = " + method.getReturnType());
//                }
            }

        }
        System.out.println("result = " + result);
        return result;
    }
    private boolean needLogin(HttpServletRequest request, String path) {
        return this.isRequireAuth() && !this.alreadyLogin(request) && !this.checkLoginParam(request) && !"/login.html".equals(path) && !path.startsWith("/css") && !path.startsWith("/js") && !path.startsWith("/img");
    }
    private boolean checkLoginParam(HttpServletRequest request) {
        String usernameParam = request.getParameter("loginUsername");
        String passwordParam = request.getParameter("loginPassword");
        if (null != this.username && null != this.password) {
            return this.username.equals(usernameParam) && this.password.equals(passwordParam);
        } else {
            return false;
        }
    }
    private boolean isRequireAuth() {
        return this.username != null;
    }
    private boolean alreadyLogin(HttpServletRequest request) {
        HttpSession session = request.getSession(false);
        return session != null && session.getAttribute("lite-flow") != null;
    }
    private void returnResourceFile(String fileName, String uri, HttpServletResponse response) throws IOException {
        String filePath = this.getFilePath(fileName);
        if (filePath.endsWith(".html")) {
            response.setContentType("text/html; charset=utf-8");
        }
        if (fileName.endsWith(".jpg")) {
            byte[] bytes = Utils.readByteArrayFromResource(filePath);
            if (bytes != null) {
                response.getOutputStream().write(bytes);
            }
        } else {
            String text = Utils.readFromResource(filePath);
            if (text == null) {
                response.sendRedirect(uri + "/login.html");
            } else {
                if (fileName.endsWith(".css")) {
                    response.setContentType("text/css;charset=utf-8");
                } else if (fileName.endsWith(".js")) {
                    response.setContentType("text/javascript;charset=utf-8");
                }

                response.getWriter().write(text);
            }
        }
    }
    private String getFilePath(String fileName) {
        return "view" + fileName;
    }
2.2.2配置web.xml
在liteflow-util内web.xml配置自定义的servlet
    <servlet>
        <servlet-name>handOfLite</servlet-name>
        <servlet-class>com.xx.utils.liteflow.handler.HandServlet</servlet-class>
        <init-param>
            <param-name>loginUsername</param-name>
            <param-value>Username</param-value>
        </init-param>
        <init-param>
            <param-name>loginPassword</param-name>
            <param-value>Password</param-value>
        </init-param>
        <load-on-startup>5</load-on-startup>
    </servlet>

    <servlet-mapping>
        <servlet-name>handOfLite</servlet-name>
        <url-pattern>/hand-of-lite/*</url-pattern>
    </servlet-mapping>
2.2.3页面准备
在liteflow-util内准备显示组件的页面
![]()
2.2.4访问页面
在liteflow-test内添加liteflow-util的依赖
<dependency>
    <groupId>com.xx.utils</groupId>
    <artifactId>liteflow</artifactId>
    <version>0.0.1-SNAPSHOT</version>
</dependency>
启动liteflow-test工程并访问对应的路径,看到2.2.3准备的页面
![]()
2.3获取组件并回显
2.3.1自定义注解
在liteflow-util内自定义注解,作用装配导入需要的资源类和配置
@Retention(value = java.lang.annotation.RetentionPolicy.RUNTIME)
@Target(value = { java.lang.annotation.ElementType.TYPE })
@Documented
@Import({LiteFlowApplicationContext.class, FlowExecutor.class, LiteflowConfig.class, IdGeneratorHolder.class})
@ComponentScan(
        basePackages = {"com.xx.utils", "com.xx.utils.liteflow"}
)
public @interface EnableLiteFlow {

}
2.3.2引入jar包依赖
在liteflow-util内引入lite-flow核心依赖
<dependency>
    <groupId>com.yomahub</groupId>
    <artifactId>liteflow-spring</artifactId>
    <version>2.8.3</version>
</dependency>
在liteflow-test内引入liteflow-util依赖
<dependency>
    <groupId>com.xx.utils</groupId>
    <artifactId>liteflow</artifactId>
    <version>0.0.1-SNAPSHOT</version>
</dependency>
2.3.3配置liteflow-util
在liteflow-test中使用自定义注解导入需要的配置
@Configuration
@EnableLiteFlow
public class LiteFlowConfig {
}
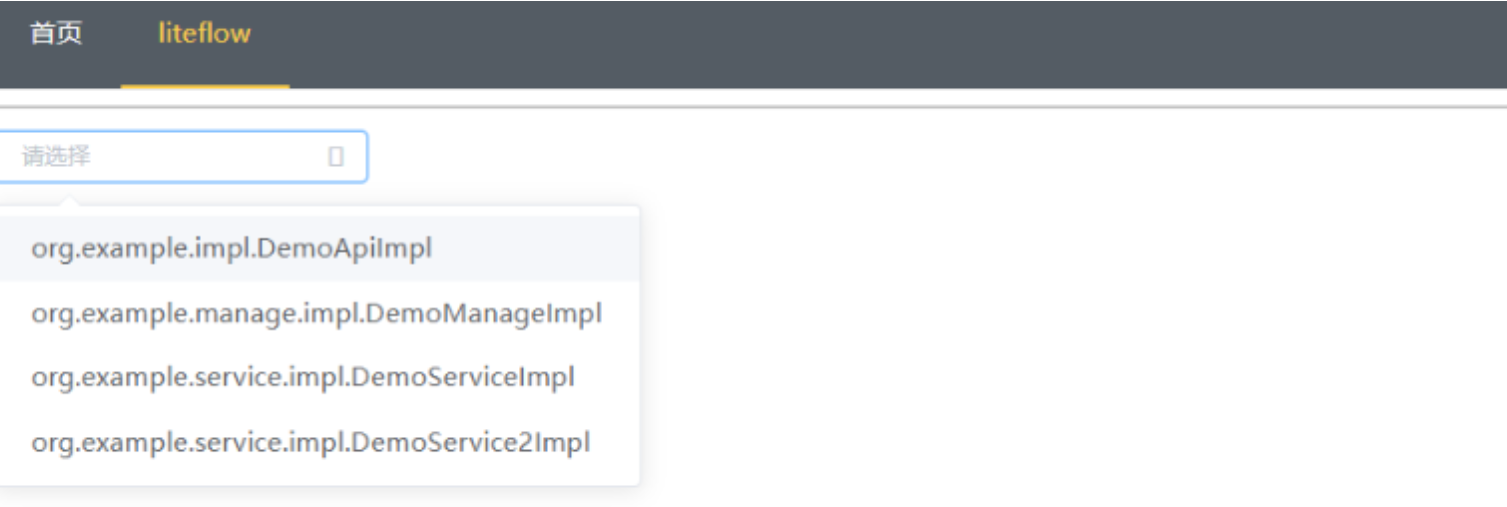
2.3.4显示组件类
重启liteflow-test,访问页面显示已获取到的组件集合
![]()
2.4创建新的组件
liteflow-util提供对于的RequestMapping创建和保存node
@RestController
@RequestMapping("/node")
public class NodeController {
    private static final Logger log = LoggerFactory.getLogger(NodeController.class);

    /**
     * 构建一个普通组件
     */
    @RequestMapping("/createCommonNode")
    @ResponseBody
    public Boolean createCommonNode(@RequestBody NodeParam nodeParam) {
        log.info("NodeController -> createCommonNode start, nodeParam={}", nodeParam.toString());
        try {
            //构建一个普通组件
            LiteFlowNodeBuilder.createCommonNode().setId(nodeParam.getId()).setName(nodeParam.getName()).setClazz(nodeParam.getClazz()).build();
            return Boolean.TRUE;
        } catch (Exception e) {
            return Boolean.FALSE;
        }
    }
    /**
     * 构建一个普通条件组件
     */
    @RequestMapping("/createSwitchNode")
    @ResponseBody
    public Boolean createSwitchNode(@RequestBody NodeParam nodeParam) {
        try {
           LiteFlowNodeBuilder.createSwitchNode().setId(nodeParam.getId()).setName(nodeParam.getName()).setClazz(nodeParam.getClazz()).build();
            return Boolean.TRUE;
        } catch (Exception e) {
            return Boolean.FALSE;
        }
    }
}
2.5创建新的流程
https://liteflow.yomahub.com/pages/v2.8.X/9aa85a/
LiteFlowChainELBuilder.createChain().setChainName("chain2").setEL(
  "THEN(a, b, WHEN(c, d))"
).build();
3、整体的总结
其实整体的思想就是提供一个jar包,从这个jar包里可以获取到被依赖工程里的类创建对应的组件、创建流程、保存流程、回显流程、执行流程等,这里涉及springbean的生命周期、上下文环境、httpservlet、自定义注解、反射、前端页面等相关知识的融合应用。
作者:京东健康 马仁喜
来源:京东云开发者社区