摘要:编写一个Ascend C的sqrt算子,并通过内核调用方式在cpu和npu模式下进行验证。
本文分享自华为云社区《【2023 · CANN训练营第一季】——Ascend C sqrt算子实战》,作者:dayao。
前言
编写一个Ascend C的sqrt算子,并通过内核调用方式在cpu和npu模式下进行验证。在训练营沙箱环境下,cpu模式工作正常结果正确。
一、概述
先简单回顾下TIK C++算子矢量编程的流程和实现。
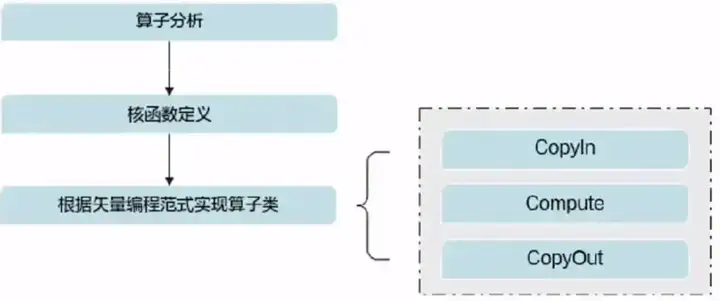
矢量算子开发流程如下:
主要工作内容有:
1、算子分析:确定输入输出,确定数学表达式以及底层实现接口,确定核函数定义。
2、算子类的实现:实现init()和process()。init()完成内存初始化,实质上体现的是多核运行,和单核数据切分以及是否开启double buffer优化;Process()实现的是CopyIn,Compute、CopyOut三个流水任务。
3、算子验证:通过核函数的内核调用符的方式调用算子,计算出结果,并于使用相同输入用numpy计算结果进行比对,误差在一定范围内即可。实际应用中,需要使用原有框架的算子进行计算精度比对。
二、算子分析
算子定义如下:假定仍是8个逻辑核。
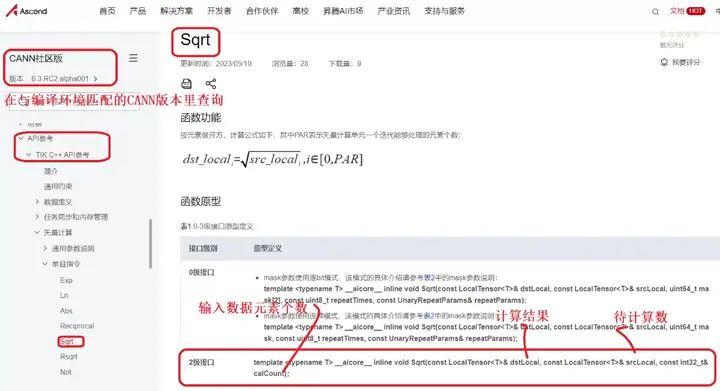
查询TIK C++的API可知,可以使用(TIK C++ API/矢量计算/单目/Sqrt,采用2级接口)完成运算,得到最终结果。
三、代码分析
直接在训练营课程提供的add_tik2算子工程上修改。代码地址:https://gitee.com/zgx950813/samples/tree/master/tik2_demo/kernel_samples/kernel_add_sample
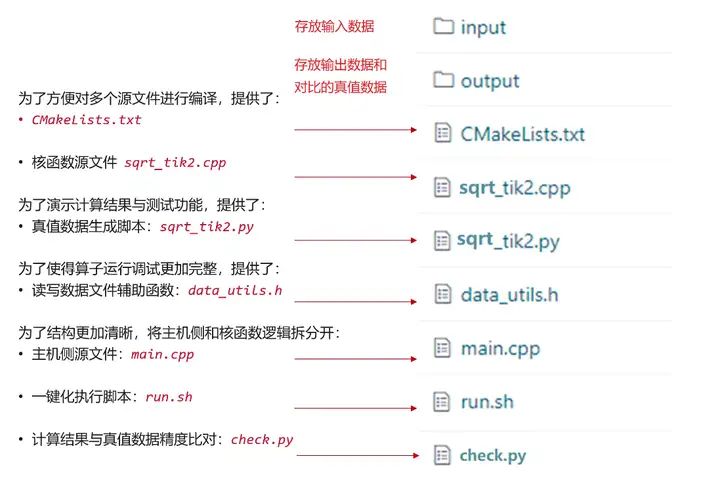
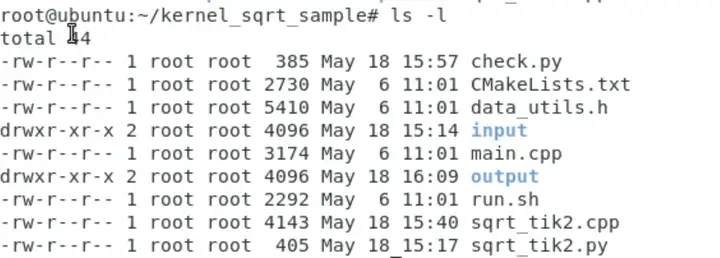
修改代码目录结构如下:CMakeLists.txt和data_utils.h未作修改,编译和执行脚本run.sh只改了计算结果与真值比对部分。
一)、核函数定义
与例程相比,输入参数只有x。
extern "C" __global__ __aicore__ void sqrt_tik2(__gm__ uint8_t* x, __gm__ uint8_t* z)
{
 KernelSqrt op;
 op.Init(x, z);
 op.Process();
}
二)、算子类
实现方式与add例程类似。init()函数里初始化内存:x,y的Global Memory ;流水线任务通讯内存;Process()实现流水线任务;按范式编写CopyIn、Compute、CopyOut。与add例程最大差异是,在compute函数中,调用sqrt的2类接口API实现计算。
class KernelSqrt {
public:
    __aicore__ inline KernelSqrt() {}
    __aicore__ inline void Init(__gm__ uint8_t* x, __gm__ uint8_t* z)
    {
 // get start index for current core, core parallel
 xGm.SetGlobalBuffer((__gm__ half*)x + block_idx * BLOCK_LENGTH, BLOCK_LENGTH);
 zGm.SetGlobalBuffer((__gm__ half*)z + block_idx * BLOCK_LENGTH, BLOCK_LENGTH);
 // pipe alloc memory to queue, the unit is Bytes
 pipe.InitBuffer(inQueueX, BUFFER_NUM, TILE_LENGTH * sizeof(half));
 pipe.InitBuffer(outQueueZ, BUFFER_NUM, TILE_LENGTH * sizeof(half));
    }
    __aicore__ inline void Process()
    {
 // loop count need to be doubled, due to double buffer
 constexpr int32_t loopCount = TILE_NUM * BUFFER_NUM;
 // tiling strategy, pipeline parallel
 for (int32_t i = 0; i < loopCount; i++) {
 CopyIn(i);
 Compute(i);
 CopyOut(i);
        }
    }
private:
    __aicore__ inline void CopyIn(int32_t progress)
    {
 // alloc tensor from queue memory
 LocalTensor<half> xLocal = inQueueX.AllocTensor<half>();
 // copy progress_th tile from global tensor to local tensor
 DataCopy(xLocal, xGm[progress * TILE_LENGTH], TILE_LENGTH);
 // enque input tensors to VECIN queue
 inQueueX.EnQue(xLocal);
    }
    __aicore__ inline void Compute(int32_t progress)
    {
 // deque input tensors from VECIN queue
 LocalTensor<half> xLocal = inQueueX.DeQue<half>();
 LocalTensor<half> zLocal = outQueueZ.AllocTensor<half>();
 // call Sqrt instr for computation
 Sqrt(zLocal, xLocal, TILE_LENGTH);
 // enque the output tensor to VECOUT queue
 outQueueZ.EnQue<half>(zLocal);
 // free input tensors for reuse
 inQueueX.FreeTensor(xLocal);
    }
    __aicore__ inline void CopyOut(int32_t progress)
    {
 // deque output tensor from VECOUT queue
 LocalTensor<half> zLocal = outQueueZ.DeQue<half>();
 // copy progress_th tile from local tensor to global tensor
 DataCopy(zGm[progress * TILE_LENGTH], zLocal, TILE_LENGTH);
 // free output tensor for reuse
 outQueueZ.FreeTensor(zLocal);
    }
private:
 TPipe pipe;
 // create queues for input, in this case depth is equal to buffer num
 TQue<QuePosition::VECIN, BUFFER_NUM> inQueueX;
 // create queue for output, in this case depth is equal to buffer num
 TQue<QuePosition::VECOUT, BUFFER_NUM> outQueueZ;
 GlobalTensor<half> xGm, zGm;
};
三)、核函数调用
1、在CPU模式下,通过ICPU_RUN_KF调用
ICPU_RUN_KF(sqrt_tik2, blockDim, x, z); // use this macro for cpu debug
2、在NPU模式下,通过<<<>>>调用
#ifndef __CCE_KT_TEST__
// call of kernel function
void sqrt_tik2_do(uint32_t blockDim, void* l2ctrl, void* stream, uint8_t* x, uint8_t* z)
{
    sqrt_tik2<<<blockDim, l2ctrl, stream>>>(x, z);
}
#endif
由于<<<>>>,只能在NPU模式下调用,所以需要用条件编译,不在CPU调试模式下有效。在调用sqrt_tik2_do,需要按ascendcl应用编程的要求进行。
3、调用代码
通过“__CCE_KT_TEST__”宏区分CPU和NPU模式。
int32_t main(int32_t argc, char* argv[])
{
 size_t inputByteSize = 8 * 2048 * sizeof(uint16_t);  // uint16_t represent half
 size_t outputByteSize = 8 * 2048 * sizeof(uint16_t);  // uint16_t represent half
    uint32_t blockDim = 8;
#ifdef __CCE_KT_TEST__
    uint8_t* x = (uint8_t*)tik2::GmAlloc(inputByteSize);
    uint8_t* z = (uint8_t*)tik2::GmAlloc(outputByteSize);
 ReadFile("./input/input_x.bin", inputByteSize, x, inputByteSize);
 // PrintData(x, 16, printDataType::HALF);
 ICPU_RUN_KF(sqrt_tik2, blockDim, x, z); // use this macro for cpu debug
 // PrintData(z, 16, printDataType::HALF);
 WriteFile("./output/output_z.bin", z, outputByteSize);
    tik2::GmFree((void *)x);
    tik2::GmFree((void *)z);
#else
 aclInit(nullptr);
 aclrtContext context;
 aclError error;
    int32_t deviceId = 0;
 aclrtCreateContext(&context, deviceId);
 aclrtStream stream = nullptr;
 aclrtCreateStream(&stream);
    uint8_t *xHost, *zHost;
    uint8_t *xDevice, *zDevice;
 aclrtMallocHost((void**)(&xHost), inputByteSize);
 aclrtMallocHost((void**)(&zHost), outputByteSize);
 aclrtMalloc((void**)&xDevice, inputByteSize, ACL_MEM_MALLOC_HUGE_FIRST);
 aclrtMalloc((void**)&zDevice, outputByteSize, ACL_MEM_MALLOC_HUGE_FIRST);
 ReadFile("./input/input_x.bin", inputByteSize, xHost, inputByteSize);
 // PrintData(xHost, 16, printDataType::HALF);
 aclrtMemcpy(xDevice, inputByteSize, xHost, inputByteSize, ACL_MEMCPY_HOST_TO_DEVICE);
 sqrt_tik2_do(blockDim, nullptr, stream, xDevice, zDevice); // call kernel in this function
 aclrtSynchronizeStream(stream);
 aclrtMemcpy(zHost, outputByteSize, zDevice, outputByteSize, ACL_MEMCPY_DEVICE_TO_HOST);
 // PrintData(zHost, 16, printDataType::HALF);
 WriteFile("./output/output_z.bin", zHost, outputByteSize);
 aclrtFree(xDevice);
 aclrtFree(zDevice);
 aclrtFreeHost(xHost);
 aclrtFreeHost(zHost);
 aclrtDestroyStream(stream);
 aclrtResetDevice(deviceId);
 aclFinalize();
#endif
 return 0;
}
四)、基准数据生成——sqrt_tik2.py
使用numpy生成input_x和基准结果golden。
import numpy as np
def gen_golden_data_simple():
 input_x = np.random.uniform(0, 100, [8, 2048]).astype(np.float16)
    golden = np.sqrt(input_x).astype(np.float16)
 input_x.tofile("./input/input_x.bin")
 golden.tofile("./output/golden.bin")
if __name__ == "__main__":
 gen_golden_data_simple()
五)、计算结果比较
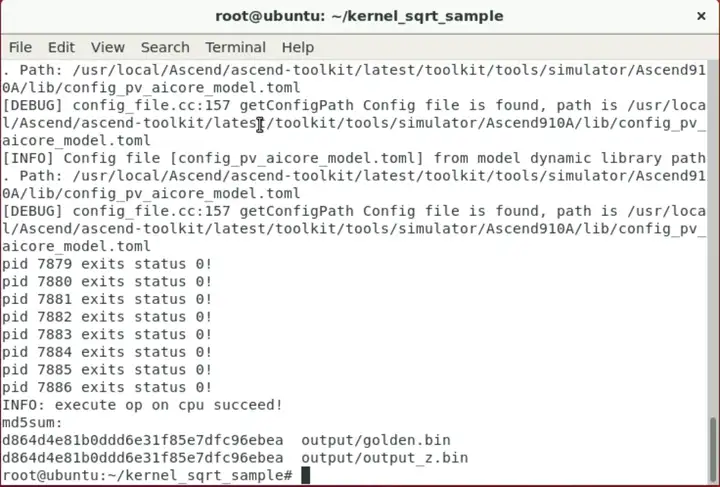
使用numpy的allclose()函数比较算子计算与基准数据的结果。实际上由于npu模式编译出错,实际未执行改函数进行比较。CPU模式下,算子计算出的结果与基准golden数据完全一致,两者的md5相同。
四、编译运行
本次课程提供了沙箱运行环境,想个办法把代码搞进去。
一)、配置环境变量
二)、CPU模式
cpu模式顺利编译运行,结果与对比组完全一致。
三)、NPU模式
npu模式下编译报错,因为沙箱时间有限,以后有机会再研究。
点击关注,第一时间了解华为云新鲜技术~
