feilong 3.0.9 发布了,feilong 是一个让Java开发更简便的工具库。
- 让你从大量重复的底层代码中脱身,提高开发效率;
- 让你的代码
更简炼,易写、易读、易于维护;
文档地址: http://feilong-core.mydoc.io/
单元测试数 增加至 2259 个, 单元测试覆盖率 增加至 91% ,javadoc 比率 83%
本次升级共有 2 处变更, 具体参见 3.0.9 milestone
#298 修改 SftpFileTransferBeanDefinitionParser javadoc [javadoc]
#297 ✨ 新增 feilong-net-wxwork 企业微信机器人 [enhancement]
使用feilong 发企业微信机器人
企业微信机器人在日常的使用场景中越来越多, 比如服务器关键任务告警,定时发通知提醒等等, 和短信相比即免费又不像短信逐渐只有接收验证码的功能, 那么问题来了,如何使用feilong来发送企业微信机器人呢?
简单 3 步
第1步: jar 依赖
必要依赖
    <dependency>
      <groupId>com.github.ifeilong</groupId>
      <artifactId>feilong</artifactId>
      <version>3.0.9</version>
    </dependency>

    <dependency>
      <groupId>org.apache.httpcomponents</groupId>
      <artifactId>httpmime</artifactId>
      <version>4.5.12</version>
      <exclusions>
        <exclusion>
          <artifactId>httpclient</artifactId>
          <groupId>org.apache.httpcomponents</groupId>
        </exclusion>
      </exclusions>
    </dependency>

    <dependency>
      <groupId>org.apache.httpcomponents</groupId>
      <artifactId>httpclient</artifactId>
      <version>4.5.12</version>
    </dependency>

    <dependency>
      <groupId>org.springframework</groupId>
      <artifactId>spring-beans</artifactId>
      <version>5.2.7.RELEASE</version>
    </dependency>
    <dependency>
      <groupId>org.springframework</groupId>
      <artifactId>spring-context</artifactId>
      <version>5.2.7.RELEASE</version>
    </dependency>
for test 和日志
    <!--下面是for test 和日志-->
    <dependency>
      <groupId>org.springframework</groupId>
      <artifactId>spring-test</artifactId>
      <version>5.2.7.RELEASE</version>
      <scope>test</scope>
    </dependency>

    <dependency>
      <groupId>org.slf4j</groupId>
      <artifactId>slf4j-api</artifactId>
      <version>1.7.30</version>
    </dependency>
    <dependency>
      <groupId>org.slf4j</groupId>
      <artifactId>slf4j-log4j12</artifactId>
      <version>1.7.30</version>
    </dependency>
    <dependency>
      <groupId>log4j</groupId>
      <artifactId>log4j</artifactId>
      <version>1.2.17</version>
    </dependency>
    <dependency>
      <groupId>junit</groupId>
      <artifactId>junit</artifactId>
      <version>4.13</version>
      <scope>test</scope>
    </dependency>
    <dependency>
      <groupId>org.hamcrest</groupId>
      <artifactId>hamcrest-library</artifactId>
      <version>1.3</version>
      <scope>test</scope>
    </dependency>
第2步: 使用xml 配置机器人
wxbot.xml
注意xml中需要使用feilong 的customer xml tag
feilong:wxworkBot 只有一个核心自定义属性, key 是企业微信机器人对应的key , key 参考 如何配置群机器人?
<?xml version="1.0" encoding="UTF-8"?>
<beans xmlns="http://www.springframework.org/schema/beans" xmlns:xsi="http://www.w3.org/2001/XMLSchema-instance"
	xmlns:feilong="http://www.feilong.com/schema/feilong"

	xsi:schemaLocation="
	http://www.springframework.org/schema/beans http://www.springframework.org/schema/beans/spring-beans.xsd
    http://www.feilong.com/schema/feilong http://www.feilong.com/schema/feilong/feilong.xsd
    ">

	<feilong:wxworkBot id="wxworkBot" key="80fa900e-c601-41a9-987c-ffa48f1d9e27" />

</beans>
第3步: 使用
简单小示例:
package com.feilong.namespace;
import static org.hamcrest.MatcherAssert.assertThat;
import static org.hamcrest.Matchers.allOf;
import static org.hamcrest.Matchers.hasProperty;
import static org.hamcrest.Matchers.is;
import org.junit.Test;
import org.springframework.beans.factory.annotation.Autowired;
import org.springframework.beans.factory.annotation.Qualifier;
import org.springframework.test.context.ContextConfiguration;
import org.springframework.test.context.junit4.AbstractJUnit4SpringContextTests;
import com.feilong.net.wxwork.bot.WxworkBot;
import com.feilong.net.wxwork.bot.message.WxworkResponse;
@ContextConfiguration(locations = { "classpath*:wxbot.xml" })
public class WxworkBotTagTest extends AbstractJUnit4SpringContextTests{
@Autowired
@Qualifier("wxworkBot")
private WxworkBot wxworkBot;
//---------------------------------------------------------------
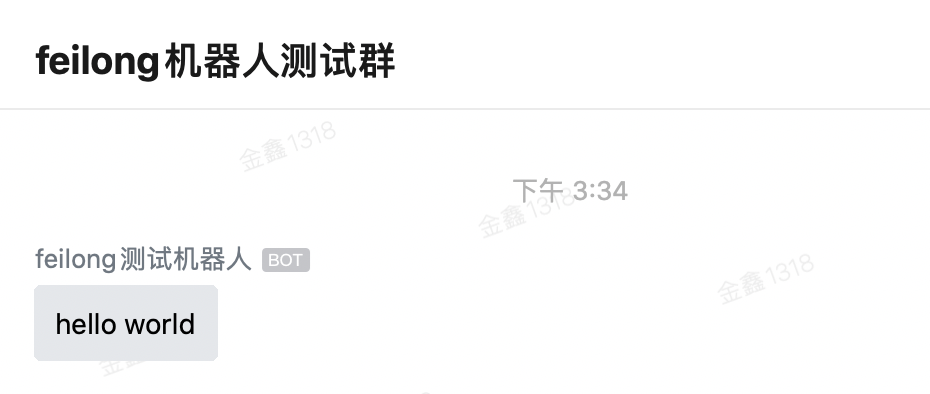
@Test
public void test(){
WxworkResponse wxworkResponse = wxworkBot.sendMessage("hello world");
assertThat(
wxworkResponse,
allOf(
hasProperty("isSuccess", is(true)), //
hasProperty("errcode", is("0"))));
}
}
执行这个单元测试, 你将会收到企业微信机器人发的消息
![image]()
关于 WxworkBot
com.feilong.net.wxwork.bot.WxworkBot 提供了2个易用的方法
- sendMessage(String) 发送普通消息,以及Markdown格式的消息
- sendNewsMessage(Article...) 发送推送图文类型消息
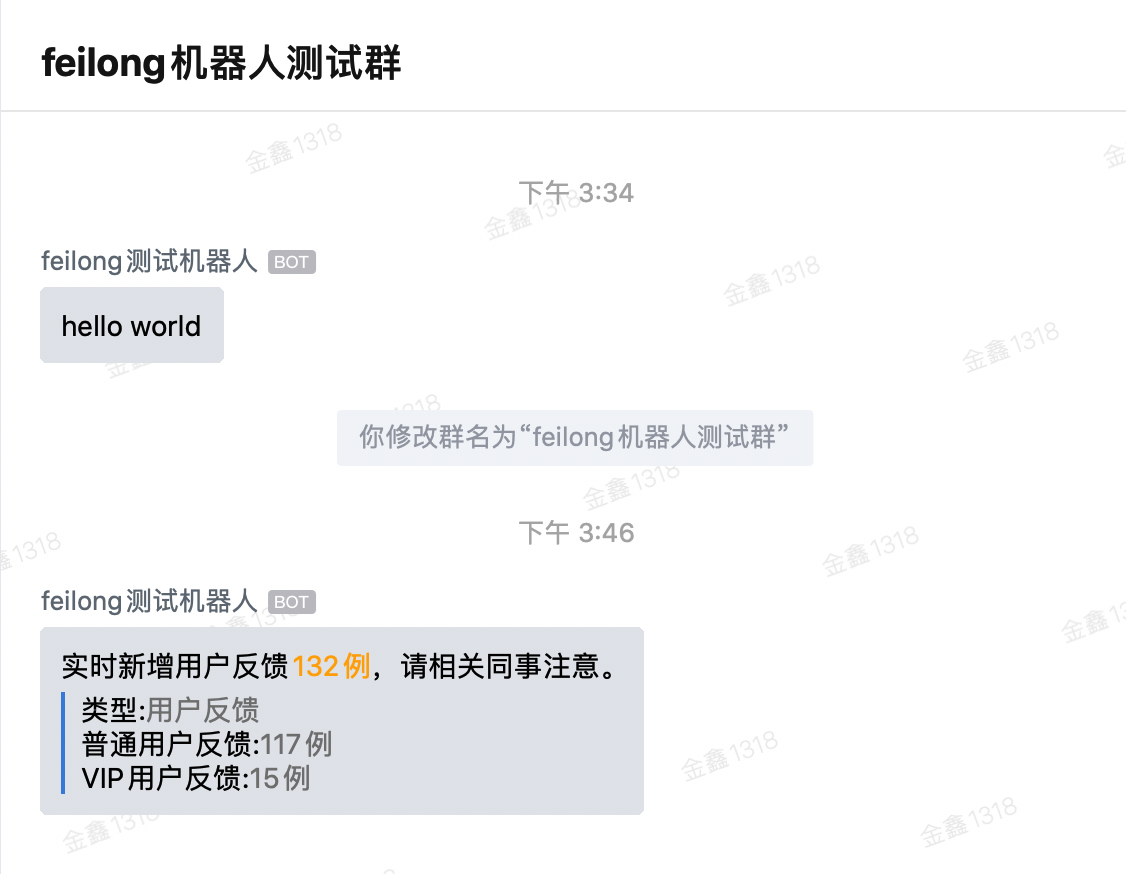
sendMessage(String) 发送普通消息,以及Markdown格式的消息
在上述 hello world示例中, 你可以看到发送简单消息, 也支持markdown格式的消息, 比如
    @Test
    public void test(){
        wxworkBot.sendMessage(
                        "实时新增用户反馈<font color=\"warning\">132例</font>,请相关同事注意。\n" + "> 类型:<font color=\"comment\">用户反馈</font>\n"
                                        + "> 普通用户反馈:<font color=\"comment\">117例</font>\n"
                                        + "> VIP用户反馈:<font color=\"comment\">15例</font>");
    }
效果:
![image]()
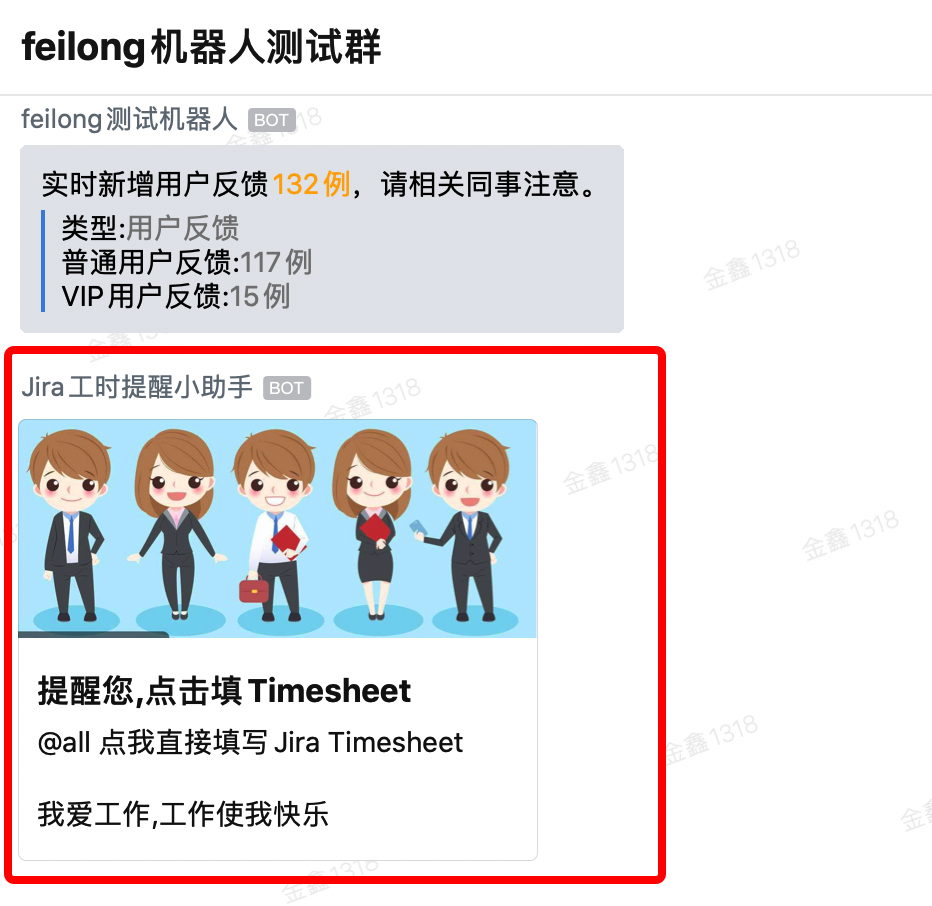
sendNewsMessage(Article...) 发送推送图文类型消息
你还可以使用sendNewsMessage 来推送图文类型的消息,
package com.feilong.namespace;

import org.junit.Test;
import org.springframework.beans.factory.annotation.Autowired;
import org.springframework.beans.factory.annotation.Qualifier;
import org.springframework.test.context.ContextConfiguration;
import org.springframework.test.context.junit4.AbstractJUnit4SpringContextTests;

import com.feilong.net.wxwork.bot.WxworkBot;
import com.feilong.net.wxwork.bot.message.news.Article;

@ContextConfiguration(locations = { "classpath*:wxbot.xml" })
public class WxworkBotTagNewsMessageTest extends AbstractJUnit4SpringContextTests{

    @Autowired
    @Qualifier("wxworkBot")
    private WxworkBot wxworkBot;

    @Test
    public void test(){
        //是 标题,不超过128个字节,超过会自动截断
        String title = "提醒您,点击填Timesheet";

        //描述,不超过512个字节,超过会自动截断
        String description = "@all 点我直接填写Jira Timesheet" + "\n\n" + "我爱工作,工作使我快乐";

        //"点我直接填写Jira Timesheet",
        String url = "http://jira.xxx.cn/plugins/servlet/aio-ts/bridge/pages/aiotimeentry";
        String img = "https://timgsa.baidu.com/timg?image&quality=80&size=b9999_10000&sec=1585320605587&di=9424f8862476b2ce819ac9f5637567b1&imgtype=0&src=http%3A%2F%2Fimgsrc.baidu.com%2Fimgad%2Fpic%2Fitem%2F503d269759ee3d6d55e89bf048166d224f4adeda.jpg";

        wxworkBot.sendNewsMessage(new Article(title, description, url, img));
    }
}
效果:
![image]()